Java NIO란?
jdk 1.3 이후 자바IO의 속도를 개선하기 위해 만들어진 클래스들이다. java.nio.channels 패키지는 7개의 인터페이스와 13개의 클래스로 구성되어 있다.
(1) JAVA NIO의 특징
- 기본 데이터형용 버퍼를 클래스로 제공해 준다.
- Character-set 인코더들과 디코더.
- 패턴과 어울린 기능은 Perl-style 정규식들로 설정.
- 채널, 새로운 I/O 추상화.
- 메모리 매핑과 파일의 lock(잡금장치)를 지원해주는 인터페이스.
- non-blocking 입출력이 가능.
(2) 채널(channel)이란?
서버와 클라이언트간의 통신 수단이다. 파일, 네트워크소켓, 프로그램 컴포넌트간의 입출력 작업을 수행할 수 있는 개방된 연결을 의미한다.
<그림출처: http://blog.naver.com/PostView.nhn?blogId=specialcase&logNo=80092963677>
(3) 채널의 특징
1. 읽기, 쓰기를 동시에 할 수 있다.
2. Buffer클래스를 사용하여 데이터형에 맞는 전용 메모리 공간을 가진다.
3. 블로킹된 스레드를 깨우거나 중단 시킬 수 있다.
4. 채널은 비동기적으로 닫히거나 중단될 수 있다.
(4) NIO의 Non-Blocking 입출력 메커니즘
서버와 클라이언트간의 통신 메커니즘은 Channel클래스로, 클라이언트로 부터 들어오는 클라이언트 요청을 나누어 각 요처에 해당하는 각각의 처리자에게 보내기위한 Selector 클래스를 사용한다.
(5) java.nio.Channels인터페이스 계층도
<그림출처: http://blog.naver.com/PostView.nhn?blogId=specialcase&logNo=80092963677>
- Channel : 모든 Channel 클래스류의 최상위 인터페이스.
- InterruptibleChannel : 채널 입출력 중 다른 스레드에 의해 채널이 중단될 수 있다.
- ReadableByteChannel : 읽기를 위한 인터페이스이다.
(6) java.nio.channels 클래스
<그림출처: http://blog.naver.com/PostView.nhn?blogId=specialcase&logNo=80092963677>
ByteBuffer 클래스
채널의 기본 입출력 버퍼는 ByteBuffer 이다.
ByteBuffer클래스는 커널 버퍼에 직접 접근할 수 있는 DirectBuffer를 지원한다.

그림출처: http://eincs.net/2009/08/java-nio-bytebuffer-channel/
(1) ByteBuffer 생성
ByteBuffer bb1=ByteBuffer.allocate(256); // 일반 버퍼 생성
ByteBuffer bb1=ByteBuffer.allocateDirect(256); // 커널버퍼에 직접 접근하는 버퍼 생성
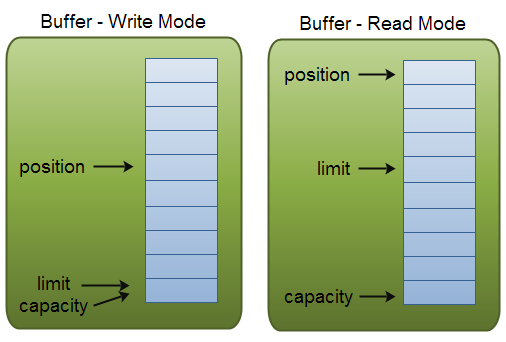
(2) ByteBuffer의 네가지 위치 포인터
- position: 현재 읽기나 쓰기를 할 위치를 가르킨다. 읽기나 쓰기가 진행될때 position값도 자동 이동된다.
- limit: 현재 ByteBuffer의 에 읽기/쓰기를 할 수 있는 위치의 한계값
- capacity: ByteBuffer의 용량(항생 버퍼의 마지막을 가르킴)
- mark: 사용자가 지정한 위치.
(3) ByteBuffer의 읽기/쓰기
- get()과 put() 메서드를 이용하여 바이트배열에 읽기/쓰기 수행
int bytesRead = inChannel.read(buf); //read into buffer.
int bytesWritten = inChannel.write(buf); //read from buffer into channel.
buf.put(127);
byte aByte = buf.get();
- getInt()/putInt() 와 같이 타입에 대한 읽기/쓰기 메서드도 제공됨
- order() 메섣로 빅엔디안/리틀엔디안 방식을 지정
(4) ByteBuffer의 주요 메서드들
- rewind() : 버퍼의 데이터를 다시 읽기 위해 position값을 0으로 설정한다.
데이터 삭제 X, position = 0, mark = 제거
- flip() : Buffer를 쓰기모드에서 읽기 모드로 스위칭한다. limit = position, position = 0, mark = 제거
- clear() : position을 0으로 설정하고, limit값을 capacity로 설정한다.
데이터 삭제 X, position = 0, limit = capacity, mark = 제거
- reset() : position값을 mark로 되돌린다.
데이터 삭제 X, position = mark, (단, mark < position 일때만 가능하면 그외에는 오류 발생)
- remaining() : (limit - position) 값 리턴
- position() : 현재 position 값 리턴
- position(int pos) : position 지정
- limit() : 현재 limit 값 리턴
- mark() : 현재 position 을 mark 로 지정
- compact() : 현재 position 부터 limit 의 사이에 있는 데이터들을 buffer의 가장 앞으로 이동시키고,
position은 데이터의 마지막 부분을 가리키고, limit = capacity , mark = 제거
(앞으로 이동시키고 남은 뒤부분 데이터들은 0으로 초기화하지 않기 때문에 쓰레기 데이터가 남음)
Channel 클래스
Buffer에 있는 내용을 송신/수신한다.
Socket을 통해 들어온 내용을 ByteBuffer에 저장하거나 Buffer의 내용으로 Packet을 생성하여 Socket을 통해 송신 하는 기능을 제공한다.
ServerSocketChannel 이나 SocketChannel 클래스는 Selector를 이용하여 Non-Blocking하게 입출력을 수행할 수 있다.
하지만 FileChannel은 Blocking만 가능하다.
ServerSocketChannel/ SocketChannel 클래스
1. Channel을 이용한 통신 처리 순서
|
서버 |
클라이언트 |
|
s-1. open()로 ServerSocketChannel 객체 생성 s-2. bind()로 Port Binding s-3. accept()로 클라이언트 연결 대기 |
|
|
|
c-1. open()로 SocketChannel객체 생성 c-2. connect()로 서버에 접속 |
|
s-4. 클라이언트가 연결되면 해당 클라이언트와 통신하는 SocketChannel 객체 반환
|
|
|
s-5. SocketChannel에 read/write |
c-3. SocketChannel에 read/write |
|
s-6. close() |
c-4. close() |
>> Server측 WorkFlow

>> Client측 WorkFlow

SocketChannel을 이용한 데이터 송수신예
(1) Opening a SocketChannel
SocketChannel socketChannel = SocketChannel.open();
socketChannel.connect(new InetSocketAddress("http://sample.com", 80));
(2) Closing a SocketChannel
socketChannel.close();
(3) Reading from a SocketChannel
ByteBuffer buf = ByteBuffer.allocate(48);
int bytesRead = socketChannel.read(buf);
First a Buffer is allocated. The data read from the SocketChannel is read into the Buffer.
socket에서 읽은 데이터를 ByteBuffer에 저장. read()는 읽을 바이트 수를 반환한다.
반환값이 -1 이면 end-of-stream(connection종료) 이다.
(4) Writing to a SocketChannel
String newData = "New String to write to file..." + System.currentTimeMillis();
ByteBuffer buf = ByteBuffer.allocate(48);
buf.clear();
buf.put(newData.getBytes());
buf.flip();
while(buf.hasRemaining()) {
channel.write(buf);
}
Selector 클래스와 SelectionKey 클래스
java.nio.channels.Selector 클래스는 SelectableChannel(채널)들을 관리하는 클래스로서 SelectionKey의 인스턴스로 관리한다.
java.nio.channels.SelectionKey 클래스는 SelectableChannel 을 선택하는데 기준이 되는 동작(ops)과 부가적인 정보 객체(att)와 이에 연결된 Selector를 함께 표현하는 클래스로 SelectableChannel를 다루는데 있어 기본적인 정보 클래스이다.

[출처] New I/O(java.nio) |작성자 미래
SocketChannel을 이용한 Non-Blocking 모드 통신
SocketChannel을 Non-Blocking Mode로 설정하여 connect(), read(), write()를 비동기로 처리할 수 있다.
(1) connect()
socketChannel.configureBlocking(false);
socketChannel.connect(new InetSocketAddress("http://sample.com", 80));
while(! socketChannel.finishConnect() ){
//wait, or do something else...
}
(2) write()
Non-blocking mode의 write()에는 아무것도 쓰지 않아도 return될 수 있다. 그래서 write() 메소드를 loop안에 쓰기를 체크하도록 작성한다.
(3) read()
Non-blocking mode의 read()는 아무것도 읽지 않아도 return될 수 있다. 그래서 반환되는 int값을 체크하여 처리해야 한다.
ServerSocketChannel을 이용한 서버 예제
package kr.co.openeg;
import java.net.InetSocketAddress;
import java.net.SocketAddress;
import java.nio.ByteBuffer;
import java.nio.channels.ServerSocketChannel;
import java.nio.channels.SocketChannel;

public class MainClass {

  public final static int PORT = 2345;

  public static void main(String[] args) throws Exception {

    ServerSocketChannel serverChannel = ServerSocketChannel.open();
    SocketAddress port = new InetSocketAddress(PORT);
    serverChannel.socket().bind(port);

    while (true) {
      System.out.println("연결 대기중.....");
      SocketChannel clientChannel = serverChannel.accept();

      String response = "Hello " + clientChannel.socket().getInetAddress() + " on port "
          + clientChannel.socket().getPort() + "\r\n";
      response += "This is " + serverChannel.socket() + " on port "
          + serverChannel.socket().getLocalPort() + "\r\n";

      byte[] data = response.getBytes("UTF-8");
      ByteBuffer buffer = ByteBuffer.wrap(data);
      while (buffer.hasRemaining())
        clientChannel.write(buffer);
      clientChannel.close();
      System.out.println("연결종료");
    }
  }
}
package kr.co.openeg;
import java.io.IOException;
import java.net.InetSocketAddress;
import java.nio.ByteBuffer;
import java.nio.channels.SelectionKey;
import java.nio.channels.Selector;
import java.nio.channels.ServerSocketChannel;
import java.nio.channels.SocketChannel;
import java.util.Iterator;
import java.util.Set;

public class MainClass2 {

  private static byte[] data = new byte[255];

  public static void main(String[] args) throws IOException {
    for (int i = 0; i < data.length; i++)
      data[i] = (byte) i;

    ServerSocketChannel server = ServerSocketChannel.open();
    server.configureBlocking(false);

    server.socket().bind(new InetSocketAddress(9000));
    Selector selector = Selector.open();
    server.register(selector, SelectionKey.OP_ACCEPT);

    while (true) {
      selector.select();
      Set readyKeys = selector.selectedKeys();
      Iterator iterator = readyKeys.iterator();
      while (iterator.hasNext()) {
        SelectionKey key = (SelectionKey) iterator.next();
        iterator.remove();
        if (key.isAcceptable()) {
          SocketChannel client = server.accept();
          System.out.println("Accepted connection from " + client);
          client.configureBlocking(false);
          ByteBuffer source = ByteBuffer.wrap(data);
          SelectionKey key2 = client.register(selector, SelectionKey.OP_WRITE);
          key2.attach(source);
        } else if (key.isWritable()) {
          SocketChannel client = (SocketChannel) key.channel();
          ByteBuffer output = (ByteBuffer) key.attachment();
          if (!output.hasRemaining()) {
            output.rewind();
          }
          client.write(output);
        }
        key.channel().close();
      }
    }
  }
}
SocketChannel을 이용한 클라이언트 예제
package kr.co.openeg;

import java.io.UnsupportedEncodingException;
import java.net.InetSocketAddress;
import java.nio.ByteBuffer;
import java.nio.channels.SocketChannel;
import java.nio.charset.Charset;

public class MainClient {

	/**
	 * @param args
	 */
	private final static String HOST="localhost";
	private final static int PORT=2345;


	public static void main(String[] args)throws Exception {

		SocketChannel channel=SocketChannel.open(new InetSocketAddress(HOST,PORT));
		//channel.configureBlocking(false);
		ByteBuffer buff=ByteBuffer.allocate(100);
		buff.clear();
		channel.read(buff);
		buff.rewind();
		System.out.println(toString(buff));
		channel.close();

	}

	private static  String toString(ByteBuffer buffer) throws UnsupportedEncodingException {
	        byte[] bytes = new byte[buffer.remaining()];
	        buffer.get(bytes);
	        return new String(bytes, "UTF-8");
	}
	private static  ByteBuffer toByteBuffer(String value) throws UnsupportedEncodingException {
	     return ByteBuffer.wrap(value.getBytes("UTF-8"));
	 }

}
자바캔의 NIO API 정리
자바 1.4의 새로운 입출력, NIO API 1부 - 버퍼와 채널
자바 1.4의 새로운 입출력, NIO API 2부 - Charset을 이용한 인코딩/디코딩처리
자바 1.4의 새로운 입출력, NIO API 3부 - 논블러킹 I/O와 Selector
'프로그래밍 > JAVA 프로그래밍' 카테고리의 다른 글
| 자바를 이용한 암호화 (0) | 2013.07.23 |
|---|---|
| 자바에서 LDAP 사용하기 (0) | 2013.07.07 |
| [자바프로그래밍-12] GUI 프로그래밍 (0) | 2012.11.20 |
| [자바프로그래밍-11] JDBC 프로그래밍 (0) | 2012.11.20 |
| [자바프로그래밍-10] 네트워크 통신 (0) | 2012.11.20 |