STEP1. openeg 프로젝트에 스프링시큐리티3 라이브러리를 추가한다.
아래 3개파일을 /WEB-INF/lib 폴더로 다운로드 한다.
 spring-security-3.2.3.RELEASE.zip
 spring-security-config-3.0.0.RELEASE.jar
spring-security-core-3.0.0.RELEASE.jar
spring-security-web-3.0.0.RELEASE.jar
spring-security-taglibs-3.0.0.RELEASE.jar
Spring-Security-3.0.zip
Spring-Security-Extensions.zip
Spring-Security-3.0-Dependencies.z01
Spring-Security-3.0-Dependencies.zip
STEP2. /WEB-INF/openeg-security.xml 파일을 생성한다.
생성하기 어려우면 아래 첨부파일을 다운로드 받아 넣는다. ^^
openeg-security.xml
STEP3. /WEB-INF/web.xml 에 필터 추가
모두 요청에 대해 springSecurity가 적용되도록 필터를 설정한다.
아래 첨부파일을 다운로드 받아서 springSecurityFilterChain 부분만 복사해서 넣는다.
STEP2에 작성한 openeg-security.xml 이 springMVC 서블릿과 관련설정파일이 로드되기전에 추가로 로드되도록 ApplicationContext를 선언한다.
첨부된 web.xml 파일에서 <context-param> 설정 부분을 복사해서 사용한다.
web.xml
STEP4. 기본적인 설정완료!!
Spring Security 가 동작하는지 확인해보자. 서버를 구동하고 http://localhost:8080/openeg/test.jsp 페이지를 요청하면 기본적인 보안 레이어가 구현되어 인증화면이 나타는 것을 볼 수 있다.
사용자명과 비밀번호, 사용자역할을 openeg-security.xml 파일에서 하드코딩했다.
guest,guest로 로그인한다.
<authentication-manager alias="authenticationManager">
<authentication-provider>
<user-service>
<user authorities="ROLE_USER" name="guest"
password="guest"/>
</user-service>
</authentication-provider>
</authentication-manager>
[추가적으로 해결해야 할 문제들]
1. 사용자계정을 이렇게는사용하기 힘들고(모든 계정을 XML파일에 등록할 수는 없으니^^) 데이터베이스 기반의 인증 프로바이더를 사용하여 해결한다.
2. 쇼핑몰이라면 로그인하지 않고 물건을 검색하는것이 가능해야 하는데 이예제는 이 사이트에 접속하면 무조건 "인증받아라" 구조이다. 이것은 사용자의 역할 정의를 통해서 해결한다.
3. 예제 사이트에 접속하면 무조건 밋밋한 로그인 페이지를 만나게 된다. 쇼핑몰이라면 헐~~ 이것다. 이건 로그인 폼을 추가해서 해결한다.
스프링 시큐리티 3 참고자료
http://www.javabeat.net/spring-security-3-0/
This article publishes the book excerpt from the book Spring Security 3.0.The following are the list of chapters in the book and brief description inside each chapters. If you are interested in receiving the future articles on book reviews and latest news on Java, please subscribe here.
Welcome to the world of Spring Security 3! I’m certainly pleased that you have acquired the first published book fully devoted to Spring Security, and i hope that it fulfills your every wish for a technical book on this fascinating subject. I’d like to use this introduction to set your expectations for the pages ahead, and give you some advice to help you along your way.
also read:
By the time you finish this book, you should feel comfortable with the architecture of Spring Security, the incorporation of Spring Security in a web-based application, and the integration of Spring Security with many types of external authentication and authorization systems.
The book is largely divided into two halves. The first half (Chapters 1-7) covers Spring Security as part of a web application from start to finish—very basic initial setup, all the way to advanced access control list security. The second half (Chapters 8-12) covers Spring Security as part of a larger software ecosystem, illustrating integration with common external systems such as OpenID, Microsoft Active Directory, and LDAP. The final chapter covers migration issues when moving from Spring Security 2 to Spring Security 3.
The book uses a simple Spring Web MVC based application to illustrate the concepts presented in the book. The application is intended to be very simple and straightforward, and purposely contains very little functionality—the goal of this application is to encourage you to focus on the Spring Security concepts, and not get tied up in the complexities of application development. You will have a much easier time following the book if you take the time to review the sample application source code, and try to follow along with the exercises. Some tips on getting started are in Chapter 1, Anatomy of an Unsafe Application and Appendix, Additional Reference Material.
What This Book Covers
Chapter 1, Anatomy of an Unsafe Application covers a hypothetical security audit of our e-commerce site, illustrating common issues that can be resolved through proper application of Spring Security. You will learn about some basic security terminology, and review some prerequisites for getting the sample application up and running.
Chapter 2, Getting Started with Spring Security reviews basic setup and configuration of form-based authentication with Spring Security, followed by a high-level overview of how Spring Security works from start to finish to secure web requests.
Chapter 3, Enhancing the User Experience illustrates additional user-facing functionality supported by Spring Security that can increase the usability of secured sites, including a remember me function, a styled login page, logout, and password change capability.
Chapter 4, Securing Credential Storage guides you through the key configuration steps required to secure your users’ information in a JDBC database, using Spring Security APIs. Important security concepts around safe password storage are also covered in this chapter.
Chapter 5, Fine-Grained Access Control covers in-page authorization checking (partial page rendering), and business-layer security using Spring Security’s method security capabilities.
Chapter 6, Advanced Configuration and Extension provides several hands-on walkthroughs of common customizations to Spring Security implementations, including custom servlet filters, custom authentication providers, and custom exception handling. Session fixation and concurrent session control are analyzed and appropriately applied to the site with required configuration steps reviewed. Finally, explicit bean-based configuration is clearly illustrated for all Spring Security functionality covered in the book.
Chapter 7, Access Control Lists teaches you the concepts and basic implementation of business object-level security using the Spring Security Access Control Lists module—a powerful module with very flexible applicability to challenging business security problems.
Chapter 8, Opening up to OpenID covers OpenID-enabled login and user information exchange, as well as a high-level overview of the logical flow of an OpenID-enabled system.
Chapter 9, LDAP Directory Services provides a guide to application integration with an LDAP directory server, including practical tips on different types of integrations with LDAP data.
Chapter 10, Single Sign On with Central Authentication Service shows how integration with Central Authentication Service (CAS) can provide single sign-on support to your Spring Security-enabled application.
Chapter 11, Client Certificate Authentication makes X.509 certificate-based authentication a clear alternative for certain business scenarios where managed certificates can add an additional layer of security to our application.
Chapter 12, Spring Security Extensions covers the Spring Security Kerberos extension project, which exposes a Kerberos integration layer for user authentication in our Spring Security application providing compatibility with a Unix Kerberos environment or Microsoft Active Directory.
Chapter 13, Migration to Spring Security 3 lays out the major differences between Spring Security 2 and Spring Security 3, including notable configuration changes, class and package migrations, and important new features. If you are familiar with Spring Security 2, we recommend that you read this chapter first, as it may make it easier to tie the examples back to code with which you are familiar.
Appendix, Additional Reference Material covers some reference material, which we feel is helpful (and largely undocumented) and too comprehensive to insert in the text of the chapters.
Securing Credential Storage
Up to this point, we’ve updated the JBCP Pets site with user-friendly functionality, including a custom login page, and change password and remember me features.
In this chapter, we’ll make a leap to a database-backed authentication store from the in-memory store we have used in the book until this point. We’ll explore the default expected Spring Security database schema, and will look into ways to extend JDBC implementation with customization.
During the course of this chapter, we’ll:
- Understand how to configure Spring Security to utilize the services of a JDBC-accessible database to store and authenticate users
- Learn how to configure a JDBC-compatible in-memory database using HSQLDB, for developer testing purposes
- Work through the process of adapting Spring Security JDBC to an existing legacy schema
- Examine two techniques for user and password management, both with out of the box and custom techniques
- Examine different methods of configuring password encoding
- Understand the password salting technique of providing additional security to stored passwords
- Solve the problem of allowing user remember me tokens to persist even if the server restarts
- Secure the application transport layer by understanding how to configure SSL/TLS encryption and port mapping
Database-backed authentication with Spring Security
An obvious issue with our more security-conscious implementation of JBCP Pets is that our in-memory storage of users and passwords is too short-lived to be user-friendly. As soon as the application is restarted, any new user registrations, password changes, or other activity will be lost. This isn’t acceptable, so the next logical implementation step when securing JBCP Pets will be to reconfigure Spring Security to utilize a relational database for user storage and authentication. The use of a JDBC-accessible relational database will allow user data to persist through application server restarts, and is more typical of real-world Spring Security use.
Configuring a database-resident authentication store
The first portion of this exercise involves setting up an instance of the Java-based relational database HyperSQL DB (or HSQL, for short), populated with the Spring Security default schema. We’ll configure HSQL to run in-memory using Spring 3′s embedded database configuration feature—a significantly simpler method of configuration than setting up the database by hand.
Keep in mind that in this example (and the remainder of the book), we’ll use HSQL, primarily, due to its ease of setup. We encourage you to tweak the configuration and use the database of your preference if you’re following along with the examples. As we didn’t want this portion of the book to focus on the complexities of database setup, we chose convenience over realism for the purposes of the exercises.
Creating the default Spring Security schema
We’ve supplied an SQL file, security-schema.sql, which will create all the tables required to implement Spring Security using HSQL. If you’re following along with your own database instance, you may have to adjust the schema definition syntax to fit your particular database. We’ll place this SQL file so that it’s on the classpath in WEB-INF/classes.
Configuring the HSQL embedded database
To configure the HSQL embedded database, we’ll modify the dogstore-security. xml file to both set up the database and run SQL to create the Spring Security table
structure. First, we’ll add a reference to the jdbc XML schema definition at the top of the file:
23 | spring-security3.0.xsd" |
Next, we’ll declare the element, along with a reference to the SQL script:
1 | <jdbc:embedded-database id="dataSource" type="HSQL"> |
2 | <jdbc:script location="classpath:security-schema.sql"/> |
3 | </jdbc:embedded-database> |
If you start the server at this point, you should be able to see the initialization of the HSQL database in the logs. Remember that the declaration creates this database only in the memory, so you won’t see anything on disk, and you won’t be able to use standard tools to query it.
Configuring JdbcDaoImpl authentication store
We’ll modify the dogstore-security.xml file to declare that we’re using a JDBC UserDetailsService implementation, instead of the Spring Security in-memory UserDetailsService that we configured in Chapter 2, Getting Started with Spring Security and Chapter 3, Enhancing the User Experience. This is done with a simple change to the declaration:
1 | <authentication-manager alias="authenticationManager"> |
2 | <authentication-provider> |
3 | <b><jdbc-user-service data-source-ref="dataSource"/></b> |
4 | </authentication-provider> |
5 | </authentication-manager> |
The data-source-ref refers to the bean we declared using the shortcut declaration in the previous step.
Adding user definitions to the schema
Finally, we’ll create another SQL file that will get executed when the in-memory database is created. This SQL file will contain information about our default users, admin and guest, with the same GrantedAuthority settings that we’ve used in prior chapters. We’ll call this SQL file test-data.sql, and we’ll put it alongside security-schema.sql in WEB-INF/classes:
1 | insert into users(username, password, enabled) values |
2 | ('admin','admin',true); |
3 | insert into authorities(username,authority) values |
5 | insert into authorities(username,authority) values |
6 | ('admin','ROLE_ADMIN'); |
7 | insert into users(username, password, enabled) values |
8 | ('guest','guest',true); |
9 | insert into authorities(username,authority) values |
10 | ('guest','ROLE_USER'); |
Next, we’ll need to add this SQL file to the embedded database configuration so that it is loaded at startup:
1 | <jdbc:embedded-database id="dataSource" type="HSQL"> |
2 | <jdbc:script location="classpath:security-schema.sql"/> |
3 | <b><jdbc:script location="classpath:test-data.sql"/></b> |
4 | </jdbc:embedded-database> |
After the SQL is added to the embedded database configuration, we should be able to start the application and log in. Spring Security is now looking at the database for authentication and GrantedAuthority information!
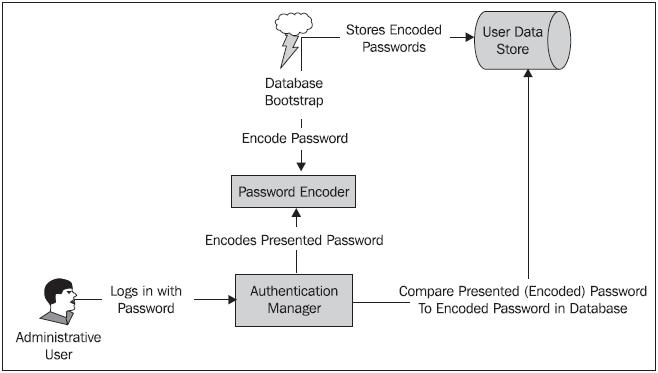
How database-backed authentication works
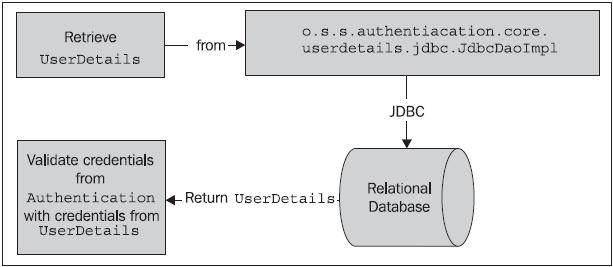
You may recall from our examination of the authentication process in Chapter 2 that the AuthenticationManager delegates to AuthenticationProvider to validate the credentials of the principal and ensure that it should be able to access the system at all. The AuthenticationProvider that we have been using in Chapters 2 and 3 was the DaoAuthenticationProvider. This provider delegates to a UserDetailsService implementation to retrieve and validate the information about the principal from the credential store. We can see this in the diagram from Chapter 2:
 As you may anticipate, the only meaningful difference between our configuration of a database-backed authentication store and the in-memory store is the implementation of the UserDetailsService. The o.s.s.core.userdetails. jdbc.JdbcDaoImpl class provides an implementation of a UserDetailsService. Instead of looking at an in-memory store (populated from the Spring Security XML configuration), the JdbcDaoImpl looks up users in a database.
 You may note that we didn’t reference the implementation class at all. This is because the declaration in the updated Spring Security
configuration will automatically configure the JdbcDaoImpl and wire it up to the AuthenticationProvider. Later in this chapter, we’ll see how to configure Spring Security to use our own implementation of JdbcDaoImpl, which continues to support the change password feature that we added to our custom InMemoryDaoImpl in Chapter 3. Let’s examine the configuration required to implement our own JdbcDaoImpl subclass that supports the change password function.
Implementing a custom JDBC UserDetailsService
As we did in one of the exercises in the previous chapter, we’ll take the baseline JdbcDaoImpl as our starting point, and extend it to support a change password function.
Creating a custom JDBC UserDetailsService class
Create the following class in the com.packtpub.springsecurity.security package:
1 | public class CustomJdbcDaoImpl extends JdbcDaoImpl implements |
3 | public void changePassword(String username, String password) { |
5 | update("UPDATE USERS SET PASSWORD = ? WHERE USERNAME = ?", |
You can see that this simple class extends the default JdbcDaoImpl with a function to update the password in the database to the new password that the user ostensibly requested. We use standard Spring JDBC functionality to do this.
Adding a Spring Bean declaration for the custom UserDetailsService
Add the following Spring Bean declaration to the dogstore-base.xml Spring configuration file:
1 | <bean id="jdbcUserService" |
2 | class="com.packtpub.springsecurity.security.CustomJdbcDaoImpl"> |
3 | <property name="dataSource" ref="dataSource"/> |
Again, the dataSource Bean reference here resolves to the declaration we made to set up the HSQL in-memory database. You’ll observe that the custom UserDetailsService implementation allows us to tweak the interaction with the database significantly. We’ll use this capability to expand the baseline functionality of the UserDetailsService in later examples. This type of customization is very common in complex applications of Spring Security.
Out of the box JDBC-based user management
As our simple extension to JdbcDaoImpl illustrated, one might extend the class, while retaining the baseline functionality at the same time. But what if we wanted to implement more advanced features, such as user registration (a must for an online store!) and user management features, allowing site administrators to create users, update passwords, and so on?
Although these types of functions are relatively easy to write with additional JDBC statements, Spring Security actually provides out of the box functionality to support many common Create, Read, Update, and Delete (CRUD) operations on users in JDBC databases. This can be convenient for simple systems, and a good base to build on for any custom requirements that a user may have.
The implementation class o.s.s.provisioning.JdbcUserDetailsManager conveniently extends JdbcDaoImpl for us, and provides a number of
helpful user-related methods, declared as part of the o.s.s.provisioning. UserDetailsManager interface:
 As you can see, the changePassword method on JdbcUserDetailsManager precisely fits a gap in the functionality of our CustomJdbcDaoImpl class – it will verify the user’s existing password when changing it. Let’s review the configuration steps required to replace our CustomJdbcDaoImpl with the JdbcUserDetailsManager.
First, we’ll have to make need to declare the JdbcUserDetailsManager bean in dogstore-base.xml:
1 | <bean id="jdbcUserService" |
2 | class="org.springframework.security |
3 | .provisioning.JdbcUserDetailsManager"> |
4 | <property name="dataSource" ref="dataSource"/> |
5 | <property name="authenticationManager" |
6 | ref="authenticationManager"/> |
The reference to AuthenticationManager matches the alias we’ve previously declared in the element in dogstore-security.xml.
Don’t forget to comment out the declaration of the CustomJdbcDaoImpl bean—we will (temporarily) not be using it.
Next, we’ll have to make some minor adjustments to the changePassword.jsp page:
1 | <h2>Change Password</h2> |
3 | <b><label for="oldpassword">Old Password</label>: |
4 | <input id="oldpassword" name="oldpassword" |
5 | size="20" maxlength="50" type="password"/> |
7 | <label for="password">New Password</label>: |
8 | <input id="password" name="password" size="20" |
9 | maxlength="50" type="password"/> |
Finally, we’ll have to make some minor adjustments to AccountController. Replace the @Autowired reference to the IChangePassword implementation with:
2 | private UserDetailsManager userDetailsManager; |
The submitChangePasswordPage also becomes much simpler, as we are relying on information about the current authenticated principal which the
JdbcUserDetailsManager determines on our behalf:
1 | public String submitChangePasswordPage(@RequestParam("oldpassword") |
3 | @RequestParam("password") String newPassword) { |
4 | userDetailsManager.changePassword(oldPassword, newPassword); |
5 | SecurityContextHolder.clearContext(); |
6 | return "redirect:home.do"; |
Once these changes are complete, you can restart the web application and try out the new change password functionality!
Notice what happens when you don’t supply the correct password. Why do you think this happens? Try to think through how you’d adjust the behavior to make it more user friendly.
Although we won’t demonstrate all of the functionality supported by JdbcUserDetailsManager, we can see that it would be very easy to wire simple JSP pages (properly secured with authorization, of course!) to allow administrators to manage users of the site—essential for a production website!
Advanced configuration of JdbcDaoImpl
JdbcDaoImpl has a number of configuration options that allow for adapting its use to an existing schema, or for more sophisticated adjustment of its existing capabilities. In many cases, it’s possible to adapt the configuration of the out of the box JDBC UserDetailsService without having to write your own code.
One important feature is the ability to add a level of indirection between users and GrantedAuthority declarations by grouping GrantedAuthority into logical sets
called groups. Users are then assigned one or more groups, whose membership confers a set of GrantedAuthority declarations.
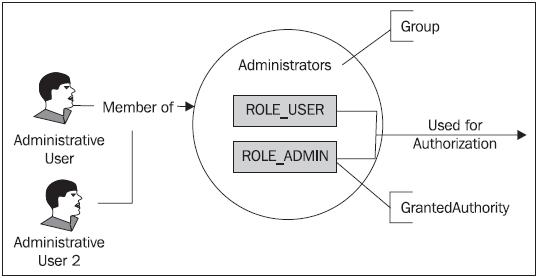 As you see in the diagram, this indirection allows the assignment of the same set of roles to multiple users, by simply assigning any new users to existing groups. Contrast this with the behavior we’ve seen this far, where we assigned GrantedAuthority directly to individual users.
This bundling of common sets of authorities can be helpful in the following scenarios:
- You need to segregate users into communities, with some overlapping roles between groups.
- You want to globally change authorization for a class of user. For example, if you have a “supplier” group, you might want to enable or disable their access to particular portions of the application.
- You have a large number of users, and you don’t need a user-level authority configuration.
Unless your application has a very small user base, there is a very high likelihood that you’ll be using group-based access control. The management ease and fl exibility of this rights management approach far outweighs the slightly greater complexity. This indirect technique of aggregating user privileges by group is commonly referred to as Group-Based Access Control (GBAC).
Group-based access control is an approach common to almost every
secured operating system or software package in the market. Microsoft
Active Directory (AD) is one of the most visible implementations of
large-scale GBAC, due to its design of slotting AD users into groups and
assignment of privileges to those groups. Management of privileges in
large AD-based organizations is made exponentially simpler through the
use of GBAC.
Try to think of the security models of the software you use—how are
users, groups, and privileges managed? What are the pros and cons of the
way the security model is written?
Let’s add a level of abstraction to JBCP Pets and apply the concept of group-based authorization to the site.
Configuring group-based authorization
We’ll add two groups to the website—regular users, which we’ll call “Users”, and administrative users, which we’ll call “Administrators”. Our existing guest and admin user accounts will be dropped into the appropriate groups through modifications to our SQL script that we use to set up the database.
Configuring JdbcDaoImpl to use groups
First, we must set properties on our JdbcDaoImpl custom subclass to enable the use of groups, and disable the use of direct authority granting to users. Add the following to the bean definition in dogstore-base.xml:
1 | <bean id="jdbcUserService" |
2 | class="com.packtpub.springsecurity.security.CustomJdbcDaoImpl"> |
3 | <property name="dataSource" ref="dataSource"/> |
4 | <b><property name="enableGroups" value="true"/> |
5 | <property name="enableAuthorities" value="false"/></b> |
Note that if you are following along and still have the code and configuration changes in place to utilize the JdbcUserManager, please revert them as we’ll be using the CustomJdbcDaoImpl for the remainder of this chapter.
Modifying the initial load SQL script
We’ll simply modify the SQL that we use to populate the database to:
- Define our groups
- Assign GrantedAuthority specifications to groups
- Assign users to groups
For simplicity, we’ll create a new SQL script called test-users-groups-data.sql. We’ll add the groups first:
1 | insert into groups(group_name) values ('Users'); |
2 | insert into groups(group_name) values ('Administrators'); |
Next, assign roles to groups:
1 | insert into group_authorities(group_id, authority) select id,'ROLE_ |
2 | USER' from groups where group_name='Users'; |
3 | insert into group_authorities(group_id, authority) select id,'ROLE_ |
4 | USER' from groups where group_name='Administrators'; |
5 | insert into group_authorities(group_id, authority) select id,'ROLE_ |
6 | ADMIN' from groups where group_name='Administrators'; |
Next, create the users:
1 | insert into users(username, password, enabled) values |
3 | insert into users(username, password, enabled) values |
Finally, assign users to groups:
1 | insert into group_members(group_id, username) select id,'guest' from |
2 | groups where group_name='Users'; |
3 | insert into group_members(group_id, username) select id,'admin' from |
4 | groups where group_name='Administrators'; |
Modifying the embedded database creation declaration
We’ll need to update the creation of our embedded HSQL database to reference this script in lieu of the existing test-data.sql script:
1 | <jdbc:embedded-database id="dataSource" type="HSQL"> |
2 | <jdbc:script location="classpath:security-schema.sql"/> |
3 | <b><jdbc:script location="classpath:test-users-groups-data.sql"/></b> |
4 | </jdbc:embedded-database> |
Note that the security-schema.sql already contains declarations for the tables required to support the group structure, so we don’t need to modify that script.
At this point, you should be able to start the JBCP Pets site again and it will behave just as before; however, the additional layer of abstraction between users and privileges will enable us to develop some sophisticated user management functionality in later exercises with a fraction of effort.
Let’s step away from the JBCP Pets scenario for a moment and cover one more important bit of configuration while we’re in this area.
Using a legacy or custom schema with database-resident authentication
It’s common for new users of Spring Security to begin their experience by adapting the JDBC user, group, or role mapping to an existing schema. Even though a legacy database doesn’t conform to the expected Spring Security schema, we can still configure the JdbcDaoImpl to map to it. Imagine we have an existing legacy database schema similar to the following figure, onto which we are going to implement Spring Security.
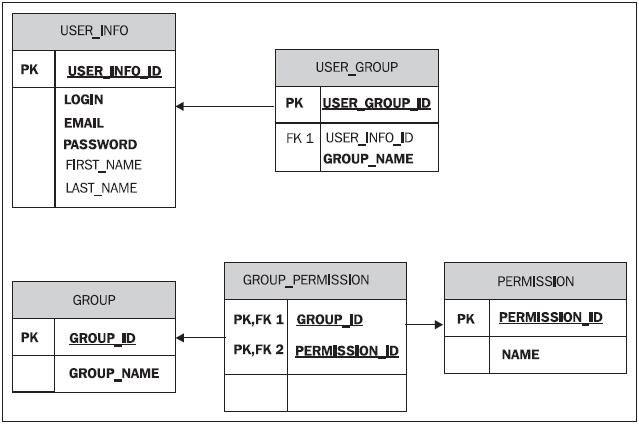 We can easily change the configuration of JdbcDaoImpl to utilize this schema and override the Spring Security expected table definitions and columns that we’re using for JBCP Pets.
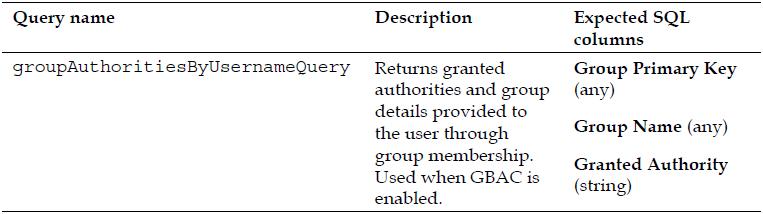
Determining the correct JDBC SQL queries
JdbcDaoImpl has three SQL queries which have a well-defined parameter and set of returned columns. We must determine the SQL that we’ll assign to each of these queries, based on its intended functionality. Each SQL query used by the JdbcDaoImpl takes the username presented at login as its one and only parameter.

 Be aware that in some cases, the return columns are not used by the default JdbcDaoImpl implementation, but they must be returned anyway. Spend some time now trying to write these queries for the database diagram on the previous page before moving on to the next step.
Configuring the JdbcDaoImpl to use custom SQL queries
In order to use the custom SQL queries for our non-standard schema, we’ll simply configure the JdbcDaoImpl properties in the Spring Bean configuration file. Note that in order to configure the JDBC queries on JdbcDaoImpl, you cannot use the declaration. You must explicitly instantiate the bean, as we’ve done with our custom JdbcDaoImpl.
1 | <bean id="jdbcUserService" |
2 | class="com.packtpub.springsecurity.security.CustomJdbcDaoImpl"> |
3 | <property name="dataSource" ref="dataSource"/> |
4 | <property name="enableGroups" value="true"/> |
5 | <property name="enableAuthorities" value="false"/> |
6 | <b><property name="usersByUsernameQuery"> |
7 | <value>SELECT LOGIN, PASSWORD, |
8 | 1 FROM USER_INFO WHERE LOGIN = ? |
11 | <property name="groupAuthoritiesByUsernameQuery"> |
12 | <value>SELECT G.GROUP_ID, G.GROUP_NAME, P.NAME |
14 | JOIN USER_GROUP UG on U.USER_INFO_ID = UG.USER_INFO_ID |
15 | JOIN GROUP G ON UG.GROUP_ID = G.GROUP_ID |
16 | JOIN GROUP_PERMISSION GP ON G.GROUP_ID = GP.GROUP_ID |
17 | JOIN PERMISSION P ON GP.PERMISSION_ID = P.PERMISSION_ID |
This is the only configuration required to use Spring Security to read settings from an existing, non-default schema! Keep in mind that utilization of an existing schema commonly requires extension of the JdbcDaoImpl to support changing of passwords, renaming of user accounts, and other user-management functions.
If you are using the JdbcUserDetailsManager to perform user management tasks, be aware that (as of this writing) only some of the over twenty SQL queries utilized by the class are accessible through configuration. Please refer to the Javadoc or source code to review the defaults for the queries used by the JdbcUserDetailsManager.
Configuring secure passwords
We recall from the security audit in Chapter 1, Anatomy of an Unsafe Application that the security of passwords stored in cleartext was a top priority of the auditors. In fact, in any secured system, password security is a critical aspect of trust and authoritativeness of an authenticated principal. Designers of a fully secured system must ensure that passwords are stored in a way in which malicious users would have an impractically difficult time compromising them.
The following general rules should be applied to passwords stored in a database:
- Passwords must not be stored in cleartext (plain text)
- Passwords supplied by the user must be compared to recorded passwords in the database
- A user’s password should not be supplied to the user upon demand (even if the user forgets it)
For the purposes of most applications, the best fit for these requirements involves one-way encoding or encryption of passwords as well as some type of randomization of the encrypted passwords. One-way encoding provides the security and uniqueness properties that are important to properly authenticate users with the added bonus that once encrypted, the password cannot be decrypted.
In most secure application designs, it is neither required nor desirable to ever retrieve the user’s actual password upon request, as providing the user’s password to them without proper additional credentials could present a major security risk. Most applications instead provide the user the ability to reset their password, either by presenting additional credentials (such as their social security number, date of birth, tax ID, or other personal information), or through an email-based system.
Storing other types of sensitive information
Many of the guidelines listed that apply to passwords apply equally to
other types of sensitive information, including social security numbers
and credit card information (although, depending on the application,
some of these may require the ability to decrypt).
It’s quite common for databases storing this type of information to represent it in multiple ways, for example, a customer’s full 16-digit credit card number would be stored in a highly encrypted form, but the last four digits might be stored in cleartext (for reference, think of any internet commerce site that displays XXXX XXXX XXXX 1234 to help you identify your stored credit cards).
You may already be thinking ahead and wondering, given our (admittedly unrealistic) approach of using SQL to populate our HSQL database with users, how do we encode the passwords? HSQL, or most other databases for that matter, don’t offer encryption methods as built-in database functions.
Typically, the bootstrap process (populating a system with initial users and data) is handled through some combination of SQL loads and Java code. Depending on the complexity of your application, this process can get very complicated.
For the JBCP Pets application, we’ll retain the embedded-database declaration and the corresponding SQL, and then add a small bit of Java to fire after the initial load to encrypt all the passwords in the database. For password encryption to work properly, two actors must use password encryption in synchronization ensuring that the passwords are treated and validated consistently.
 Password encryption in Spring Security is encapsulated and defined by implementations of the o.s.s.authentication.encoding.PasswordEncoder interface. Simple configuration of a password encoder is possible through the declaration within the
element as follows:
1 | <authentication-manager alias="authenticationManager"> |
2 | <authentication-provider user-service-ref="jdbcUserService"> |
3 | <b><password-encoder hash="sha"/></b> |
4 | </authentication-provider> |
5 | </authentication-manager> |
You’ll be happy to learn that Spring Security ships with a number of implementations of PasswordEncoder, which are applicable for different needs and security requirements. The implementation used can be specified using the hash attribute of the declaration.
The following table provides a list of the out of the box implementation classes and their benefits. Note that all implementations reside in the o.s.s.authentication. encoding package.
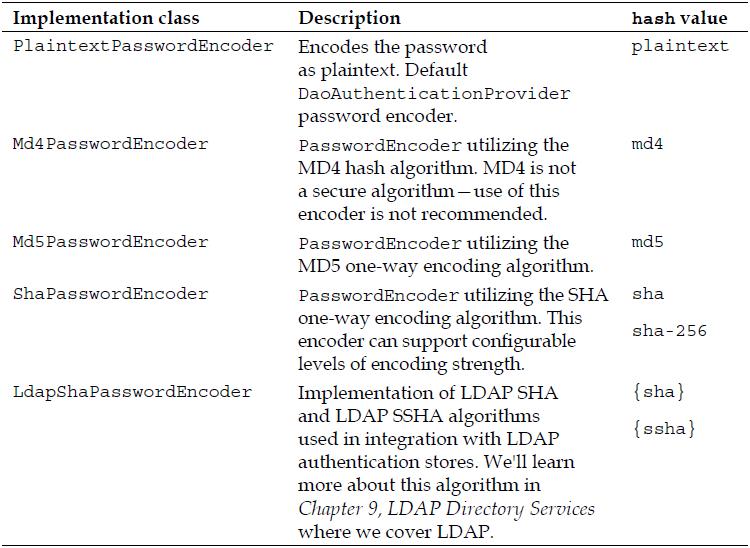 As with many other areas of Spring Security, it’s also possible to reference a bean definition implementing PasswordEncoder to provide more precise configuration and allow the PasswordEncoder to be wired into other beans through dependency injection. For JBCP Pets, we’ll need to use this bean reference method in order to encode the bootstrapped user data.
Let’s walk through the process of configuring basic password encoding for the JBCP Pets application.
Configuring password encoding
Configuring basic password encoding involves two pieces—encrypting the passwords we load into the database after the SQL script executes, and ensuring that the DaoAuthenticationProvider is configured to work with a PasswordEncoder.
Configuring the PasswordEncoder
First, we’ll declare an instance of a PasswordEncoder as a normal Spring bean:
1 | <bean class="org.springframework.security.authentication. |
2 | encoding.ShaPasswordEncoder" id="passwordEncoder"/> |
You’ll note that we’re using the SHA-1 PasswordEncoder implementation. This is an efficient one-way encryption algorithm, commonly used for password storage.
Configuring the AuthenticationProvider
We’ll need to configure the DaoAuthenticationProvider to have a reference to the PasswordEncoder, so that it can encode and compare the presented password during user login. Simply add a declaration and refer to the bean ID we defined in the previous step:
1 | <authentication-manager alias="authenticationManager"> |
2 | <authentication-provider user-service-ref="jdbcUserService"> |
3 | <b><password-encoder ref="passwordEncoder"/></b> |
4 | </authentication-provider> |
5 | </authentication-manager> |
Try to start the application at this point, and then try to log in. You’ll notice that what were previously valid login credentials are now being rejected. This is because the passwords stored in the database (loaded with the bootstrap test-users-groupsdata. sql script) are not stored in an encrypted form that matches the password encoder. We’ll need to post-process the bootstrap data with some simple Java code.
Writing the database bootstrap password encoder
The approach we’ll take for encoding the passwords loaded via SQL is to have a Spring bean that executes an init method after the embedded-database bean is
instantiated. The code for this bean, com.packtpub.springsecurity.security. DatabasePasswordSecurerBean, is fairly simple.
1 | public class DatabasePasswordSecurerBean extends JdbcDaoSupport { |
3 | private PasswordEncoder passwordEncoder; |
4 | public void secureDatabase() { |
5 | getJdbcTemplate().query("select username, password from users", |
6 | new RowCallbackHandler(){ |
8 | public void processRow(ResultSet rs) throws SQLException { |
9 | String username = rs.getString(1); |
10 | String password = rs.getString(2); |
11 | String encodedPassword = passwordEncoder.encodePassword(password, null); |
12 | getJdbcTemplate().update("update users set password = ? |
13 | where username = ?", encodedPassword,username); |
14 | logger.debug("Updating password for username: |
15 | "+username+" to: "+encodedPassword); |
The code uses the Spring JdbcTemplate functionality to loop through all the users in the database and encode the password using the injected PasswordEncoder reference. Each password is updated individually.
Configuring the bootstrap password encoder
We need to configure the Spring bean declaration such that the bean is initialized upon start of the web application and after the bean. Spring bean dependency tracking ensures that the DatabasePasswordSecurerBean executes at the proper time:
1 | <bean class="com.packtpub.springsecurity.security. |
2 | DatabasePasswordSecurerBean" |
3 | init-method="secureDatabase" depends-on="dataSource"> |
4 | <property name="dataSource" ref="dataSource"/> |
If you start the JBCP Pets application at this point, you’ll see that the passwords in the database are encoded, and login now functions properly.
Would you like some salt with that password?
If the security auditor were to examine the encoded passwords in the database, he’d find something that would still make him concerned about the website’s security. Let’s examine what the stored username and password values are for our admin and guest users:
 This looks very secure—the encrypted passwords obviously bear no resemblance to the original passwords. What could the auditor be concerned about? What if we add a new user who happens to have the same password as our admin user?
 Now, note that the encrypted password of the fakeadmin user is exactly the same as the real admin user! Thus a hacker who had somehow gained the ability to read the encrypted passwords in the database could compare their known password’s encrypted representation with the unknown one for the admin account, and see they are the same! If the hacker had access to an automated tool to perform this analysis, they could likely compromise the administrator’s account within a matter of hours.
Having personally worked with a database where passwords were
encrypted in exactly this way, my engineering team and idecided to
run a little experiment and see what the SHA-1 encrypted value of the
plaintext password password was. We then took the encrypted form of
the word password and ran a database query to see how many users
in the database had this highly insecure password. To our surprise and
dismay, we found many, including a VP of the organization. Each user
got a nice follow-up email reminder about the benefits of choosing a
hard to guess password, and development quickly got to work on a more
secure password encryption mechanism!
Recall our mention in Chapter 3 of rainbow table techniques that malicious users can use to determine user passwords if they have access to the database. These (and other) hacking techniques take advantage of the fact that hash algorithms are deterministic—the same input always leads to the same output, and as such, if an attacker tries enough inputs, they may happen to match an unknown output to the result of a known input.
One common, and effective, method of adding another layer of security to encrypted passwords is to incorporate a salt. A salt is a second plaintext component which is concatenated with the plaintext password prior to encryption in order to ensure that two factors must be used to generate (and thus compare) encrypted password values. Properly selected salts can guarantee that no two passwords will ever have the same encrypted value, thus preventing the scenario that concerned our auditor, and avoiding many common types of brute force password cracking techniques.
Best practice salts generally fall into one of two categories:
- They are algorithmically generated from some piece of data associated with the user—for example, the timestamp that the user was created
- They are randomly generated, and stored in some form (plaintext or two-way encrypted) along with the user’s password record
For example, the following diagram illustrates the simple case where the salt is the same as the user’s login name:
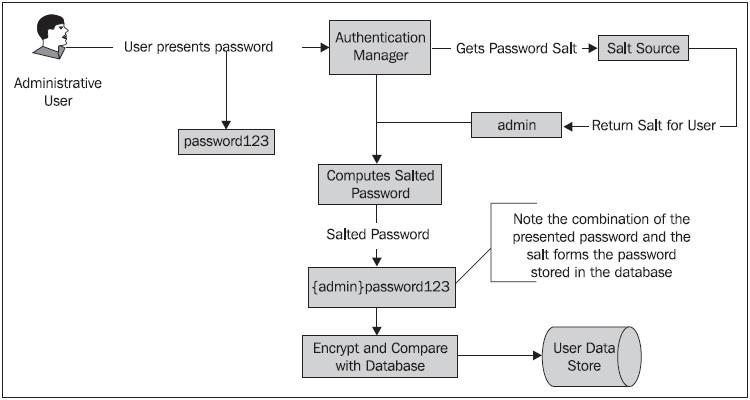 Remember that because the salt is added to the plaintext password, the salt can’t be one-way encrypted—the application needs to be able to look up or derive the appropriate salt value for a given user’s record in order to authenticate the user!
Spring Security provides us with an interface, o.s.s.authentication.dao. SaltSource, which defines a method to return a salt value from the UserDetails object, along with two out of the box implementations:
- SystemWideSaltSource defines a single, static salt used for every password. This is not significantly more secure than an unsalted password.
- ReflectionSaltSource uses a bean property of the UserDetails object to get the salt value for that user’s password.
Since salt values should be derivable from, or stored with each user record, ReflectionSaltSource is the out of the box implementation that most implementers typically use.
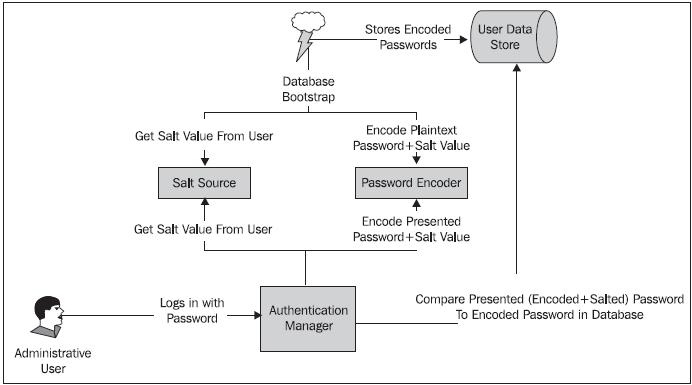
Configuring a salted password
As with configuring basic password encryption in the previous exercise, adding elements to support a salted password requires changes in both the bootstrap code and the DaoAuthenticationProvider We can examine how the workfl ow of salted passwords changes bootstrap and authentication by revising the following diagram occurred earlier in the book:
 Let’s add a level of password security by configuring the ReflectionSaltSource to salt our passwords!
Declaring the SaltSource Spring bean
In dogstore-base.xml, add a bean declaration for the SaltSource implementation we’re using:
1 | <bean class="org.springframework.security.authentication. |
2 | dao.ReflectionSaltSource" id="saltSource"> |
3 | <property name="userPropertyToUse" value="username"/> |
We’re configuring the salt source to use the username property, but this is a short-term implementation that we’ll correct in a later exercise. Can you think why this might not be a good salt value?
Wiring the PasswordEncoder to the SaltSource
We’ll need to hook up the SaltSource to the PasswordEncoder, so that the credentials the user presents upon login can be appropriately salted, prior to
comparison with stored values. This is done by adding a new declaration in dogstore-security.xml:
1 | <authentication-manager alias="authenticationManager"> |
2 | <authentication-provider user-service-ref="jdbcUserService"> |
3 | <password-encoder ref="passwordEncoder"> |
4 | <b><salt-source ref="saltSource"/></b> |
6 | </authentication-provider> |
7 | </authentication-manager> |
You’ll note that if you start up the application at this point, you won’t be able to log in. Just as in the previous exercise, the bootstrap database password encoder bean needs to be modified to include the SaltSource.
Augmenting DatabasePasswordSecurerBean
We’ll add a bean reference to the DatabasePasswordSecurerBean, as well as a reference to the UserDetailsService so that we can get the appropriate password
salt for the user:
1 | public class DatabasePasswordSecurerBean extends JdbcDaoSupport { |
3 | private PasswordEncoder passwordEncoder; |
5 | private SaltSource saltSource; |
7 | private UserDetailsService userDetailsService;</b> |
8 | public void secureDatabase() { |
9 | getJdbcTemplate().query("select username, password from users", |
10 | new RowCallbackHandler(){ |
12 | public void processRow(ResultSet rs) throws SQLException { |
13 | String username = rs.getString(1); |
14 | String password = rs.getString(2); |
15 | <b>UserDetails user = userDetailsService.loadUserByUsername(username); |
16 | String encodedPassword = passwordEncoder.encodePassword(password, |
17 | saltSource.getSalt(user));</b> |
18 | getJdbcTemplate().update("update users set password = ? |
22 | logger.debug("Updating password for username: |
23 | "+username+" to: "+encodedPassword); |
Recall that the SaltSource relies on a UserDetails object to generate the salt value. At this point, as we don’t have the database row mapped to a UserDetails object, we’ll have to make a request to the UserDetailsService (our CustomJdbcDaoImpl) to look up the UserDetails based on the username from the SQL query response.
At this point, we should be able to start the application and properly log into the system. If you try adding a new user with the same password (for example, admin) to the bootstrap SQL script, you’ll note that the password generated for the user is different, because we’re salting the passwords with the username. This makes the passwords much more secure in the unlikely event that a malicious user is able to read the passwords from the database. However, you may have some ideas as to why using the username isn’t the most secure possible salt—we’ll explore this in later exercise.
Enhancing the change password functionality
One important change that we’ll need to make is to update the change Password functionality to refer to the password encoder implementation as well. This is as
simple as adding appropriate bean references to the CustomJdbcDaoImpl class, and minor code changes in the changePassword method:
1 | public class CustomJdbcDaoImpl extends JdbcDaoImpl { |
3 | private PasswordEncoder passwordEncoder; |
5 | private SaltSource saltSource;</b> |
6 | public void changePassword(String username, String password) { |
7 | <b>UserDetails user = loadUserByUsername(username); |
8 | String encodedPassword = passwordEncoder.encodePassword |
9 | (password, saltSource.getSalt(user));</b> |
10 | getJdbcTemplate().update( |
11 | "UPDATE USERS SET PASSWORD = ? WHERE USERNAME = ?", |
12 | encodedPassword, username); |
The use of the PasswordEncoder and SaltSource here will ensure that the user’s password is properly salted when changed. Curiously, use of a PasswordEncoder and SaltSource is not supported by the JdbcUserDetailsManager, so if you are using JdbcUserDetailsManager as a baseline for customization, you will need to override quite a bit of code.
Configuring a custom salt source
As mentioned when we first configured password salting, username is a feasible, but not extremely desirable, choice for a password salt. The reason for this is that username is a salt that is under direct control of the user. If users are provided with the ability to change their username, it would be possible for malicious users to continuously change their user names—thus re-salting their passwords—and possibly determine how to construct a falsely encrypted password.
More secure still would be to have a property of the UserDetails which is chosen by the system, and never visible to, or modifiable by the user. We’ll add a property to the UserDetails object that is populated at random when a user is created. This property will become the user’s salt.
Extending the database schema
We’ll need to ensure that the salt is stored in the database along with the user record, so we’ll add a column to the default Spring Security database schema, defined in security-schema.sql:
2 | username varchar_ignorecase(50) not null primary key, |
3 | password varchar_ignorecase(50) not null, |
4 | <b>enabled boolean not null, |
5 | salt varchar_ignorecase(25) not null</b> |
Next, add the bootstrap salt values to the test-users-groups-data.sql script:
1 | insert into users(username, password, enabled, salt) values ('admin',' |
2 | admin',true,CAST(RAND()*1000000000 AS varchar)); |
3 | insert into users(username, password, enabled, salt) values ('guest',' |
4 | guest',true,CAST(RAND()*1000000000 AS varchar)); |
Remember, we’re replacing the insert statements that are already there with these new ones. Note that we’ve chosen salt values based on random number generation—any pseudo-random salt selection of your choice can be just as effective.
Tweaking configuration of the CustomJdbcDaoImplUserDetails service
Following similar steps as the custom schema exercise earlier in this chapter, we’ll add a configuration change to the query used to retrieve users from the database in order to pick up the additional ‘salt’ column. We’ll modify the CustomJdbcDaoImpl bean definition in dogstore-security.xml:
1 | <beans:bean id="jdbcUserService" |
2 | class="com.packtpub.springsecurity.security.CustomJdbcDaoImpl"> |
3 | <beans:property name="dataSource" ref="dataSource"/> |
4 | <beans:property name="enableGroups" value="true"/> |
5 | <beans:property name="enableAuthorities" value="false"/> |
6 | <b><beans:property name="usersByUsernameQuery"> |
7 | <beans:value>select username,password,enabled, |
8 | salt from users where username = ? |
Overriding the baseline UserDetails implementation
We’ll need a UserDetails implementation that tracks the salt value stored with the user record in the database. Simply overriding the Spring standard User class is sufficient for our purposes. Remember to add a getter and setter for the salt, so that the ReflectionSaltSource password salter can find the right property.
1 | package com.packtpub.springsecurity.security; |
3 | public class SaltedUser extends User { |
5 | public SaltedUser(String username, String password, |
7 | boolean accountNonExpired, boolean credentialsNonExpired, |
8 | boolean accountNonLocked, List<GrantedAuthority> |
9 | authorities, String salt) { |
10 | super(username, password, enabled, |
11 | accountNonExpired, credentialsNonExpired, |
12 | accountNonLocked, authorities); |
15 | public String getSalt() { |
18 | public void setSalt(String salt) { |
Even though we are extending the UserDetails to capture a salt field, the process would be the same if we wanted to store additional information about the user from a backing store. Extension of the UserDetails object is commonly done in conjunction with the implementation of a custom AuthenticationProvider. We’ll see an example of this in Chapter 6, Advanced Configuration and Extension.
Extending the functionality of CustomJdbcDaoImpl
We need to override the methods of JdbcDaoImpl, responsible for instantiating the UserDetails implementation that sets the default values for User. This occurs while loading the User from the database, and then copying the User into the instance that actually gets returned from the UserDetailsService:
1 | public class CustomJdbcDaoImpl extends JdbcDaoImpl { |
2 | public void changePassword(String username, String password) { |
3 | getJdbcTemplate().update( |
4 | "UPDATE USERS SET PASSWORD = ? WHERE USERNAME = ?" |
8 | protected UserDetails createUserDetails(String username, |
9 | UserDetails userFromUserQuery, |
10 | List<GrantedAuthority> combinedAuthorities) { |
11 | String returnUsername = userFromUserQuery.getUsername(); |
12 | if (!isUsernameBasedPrimaryKey()) { |
13 | returnUsername = username; |
15 | return new SaltedUser(returnUsername, |
16 | userFromUserQuery.getPassword(),userFromUserQuery.isEnabled(), |
17 | true, true, true, combinedAuthorities, |
18 | ((SaltedUser) userFromUserQuery).getSalt()); |
21 | protected List<UserDetails> loadUsersByUsername(String username) { |
22 | return getJdbcTemplate(). |
23 | query(getUsersByUsernameQuery(), |
24 | new String[] {username}, |
25 | new RowMapper«UserDetails>() { |
26 | public UserDetails mapRow(ResultSet rs, int rowNum) |
28 | String username = rs.getString(1); |
29 | String password = rs.getString(2); |
30 | boolean enabled = rs.getBoolean(3); |
31 | String salt = rs.getString(4); |
32 | return new SaltedUser(username, password, |
33 | enabled, true, true, true, |
34 | AuthorityUtils.NO_AUTHORITIES, salt); |
The methods createUserDetails and loadUsersByUsername are adapted from the superclass methods—the changes from the superclass methods are highlighted in the code listing. With these changes, you should be able to restart the application and have extra secure, randomly salted passwords. You may wish to add logging, and experiment, to see how the encrypted values change on every run of the application, as the bootstrap users are loaded.
Keep in mind that although this example illustrated the addition of a simple field to the UserDetails implementation, this approach can be used as a baseline to a highly customized UserDetails object which fits the business needs of your application. For the purposes of JBCP Pets, the auditors are now sufficiently happy with the security of passwords in the database—a job well done!
Moving remember me to the database
Something that you may have noticed by now, with our remember me implementation, is that it works very well until the application server is restarted, at which point the user’s session is forgotten. This could be inconvenient for our users, who shouldn’t have to pay attention to the maintenance and ups and downs of JBCP Pets.
Fortunately, Spring Security provides the capability to persist rememberme tokens any store implementing the o.s.s.web.authentication.rememberme.
PersistentTokenRepository interface, and ships with a JDBC implementation of this interface.
Configuring database-resident remember me tokens
Modifying our remember me configuration at this point to persist to the database is surprisingly trivial. The Spring Security configuration parser will recognize a new data-source-ref attribute on the declaration and simply switch implementation classes for RememberMeServices. Let’s review the steps required to accomplish this now.
Adding SQL to create the remember me schema
We’ll place the SQL file containing the expected schema definition on the classpath in WEB-INF/classes, alongside the other bootstrap SQL scripts we’ve been working with. Let’s call this SQL script remember-me-schema.sql:
1 | create table persistent_logins ( |
2 | username varchar_ignorecase(50) not null, |
3 | series varchar(64) primary key, |
4 | token varchar(64) not null, |
5 | last_used timestamp not null); |
Adding new SQL script to the embedded database declaration
Next, add a reference to the new SQL script that we created in the declaration in dogstore-security.xml:
1 | <jdbc:embedded-database id="dataSource" type="HSQL"> |
2 | <jdbc:script location="classpath:security-schema.sql"/> |
3 | <jdbc:script location="classpath:remember-me-schema.sql"/> |
4 | <jdbc:script location="classpath:test-users-groups-data.sql"/> |
5 | </jdbc:embedded-database> |
Configuring remember me services to persist to the database
Finally, we’ll need to make some brief configuration changes to the declaration to point it to the data source we’re using:
1 | <http auto-config="true" use-expressions="true" |
2 | access-decision-manager-ref="affirmativeBased"> |
3 | <intercept-url pattern="/login.do" access="permitAll"/> |
4 | <intercept-url pattern="/account/*.do" |
5 | access="hasRole('ROLE_USER') and fullyAuthenticated"/> |
6 | <intercept-url pattern="/*" access="hasRole('ROLE_USER')"/> |
7 | <form-login login-page="/login.do" /> |
8 | <remember-me key="jbcpPetStore" token-validity-seconds="3600" |
9 | data-source-ref="dataSource"/> |
10 | <logout invalidate-session="true" logout-success-url="" |
11 | logout-url="/logout"/> |
That’s all we need. Now, if we restart the application, it will no longer forget users who previously had a valid remember me cookie set.
Are database-backed persistent tokens more secure?
You may recall that the TokenBasedRememberMeServices we implemented in Chapter 3 use MD5 hashing across a series of user-related data to encode the cookie securely, in a way that would be hard (but not impossible) to tamper with. The o.s.s.web. authentication.rememberme.PersistentTokenBasedRememberMeServices class implements handling of persistent tokens and handles token security with a validation method, which handles potential tampering slightly differently.
PersistentTokenBasedRememberMeServices creates a unique series identifier per user, with unique tokens within that series, as the user continues to interact and be authenticated by the site. The combination of series and token are stored in the cookie, and used to authenticate the user against the persistent token store. Both series and token are randomly generated, and of configurable length, making the likelihood of successful brute force guessing by a malicious attacker extremely small.
Just like TokenBasedRememberMeServices, persistent tokens may be compromised by cookie theft or other man-in-the-middle techniques. The use of a custom subclass incorporating the IP address into the persistent token, as well as forcing username and password authentication for sensitive areas of the site, are still advised when using persistent tokens.
Securing your site with SSL
It is highly likely that you have both heard of and used SSL encryption in your daily online life. The Secure Sockets Layer (SSL) protocol, and its successor, Transport Layer Security (TLS), are used to provide transport level security for HTTP transactions over the web—these are known asHTTP Secure (HTTPS) transactions.
In summary, SSL and TLS are used to secure the raw HTTP data being transmitted between the browser client and the web server in a way that is transparent to the user. As a developer, however, it’s of critical importance to plan for the use of SSL in the design of a secure website. Spring Security provides a number of configuration options that allow for fl exible incorporation of SSL in your web application.
Although SSL and TLS are different protocols (TLS being the more
mature and recent iteration of the protocol), most people are familiar with
the term SSL, and as such we will use this term to refer to both SSL and
TLS protocols for the remainder of this book.
While a detailed examination of the mechanics of the SSL protocol are beyond the scope of this book, several excellent books and technical papers exist, which describe the specifications and protocols in very fine detail (you may want to start with RFC 5246, The Transport Layer Security (TLS) Protocol Version 1.2, at http://tools.ietf. org/html/rfc5246).
Setting up Apache Tomcat for SSL
First and foremost, if you’re planning on following along with the SSL-related examples, you’ll need to configure your application server to support SSL connections. For Apache Tomcat, this is relatively easy; if you are using another application server, please consult the relevant sections of the documentation.
Generating a server key store
We’ll need to use the Java keytool command to generate a key store. Open a command prompt and enter the following command:
1 | keytool -genkeypair -alias jbcpserver -keyalg RSA -validity 365 |
2 | -keystore tomcat.keystore -storetype JKS |
Follow the prompts using the following directions. Enter the password password for the key store and private key password.
1 | What is your first and last name? |
2 | [Unknown]: JBCP Pets Admin |
3 | What is the name of your organizational unit? |
5 | What is the name of your organization? |
7 | What is the name of your City or Locality? |
9 | What is the name of your State or Province? |
11 | What is the two-letter country code for this unit? |
13 | Is CN=JBCP Pets Admin, OU=JBCP Pets, O=JBCP Pets, L=Anywhere, ST=NH, C=US |
This will result in the creation of a file named tomcat.keystore in the current directory. This is the key store that will be used to enable Tomcat SSL.
Be aware that the command genkeypair was called (genkey in
pre-Java 6 releases of keytool).
Remember the location of this file for the next step.
Configuring Tomcat’s SSL Connector
In Apache Tomcat’s conf directory, open server.xml in an XML editor (Eclipse or equivalent will be fine), and uncomment or add the SSL Connector declaration. It
should look as follows:
1 | <Connector port="8443" protocol="HTTP/1.1" SSLEnabled="true" |
2 | maxThreads="150" scheme="https" secure="true" |
4 | keystoreFile="conf/tomcat.keystore" |
5 | keystorePass="password"/> |
Ensure the tomcat.keystore file you created in the previous step is copied to the conf directory of the Tomcat installation. After this configuration, the Tomcat server can be started, and the JBCP Pets application should be accessible on a secure port, at https://localhost:8443/JBCPPets/.
Take care to include the https and not http—depending on the browser, this problem may go undetected, and you may find yourself scratching your head as to why you are not seeing the JBCP Pets home page.
Automatically securing portions of the site
It seems reasonable to assume that if you’ve gone to the trouble of setting up SSL to secure your customers’ data, you would always want certain areas of the site to fall under the umbrella of SSL protection. Fortunately, Spring Security makes this easy, with the simple step of adding a configuration property to the declarations.
The attribute requires-channel can be added to any declaration to require that any URL matching the pattern is required to pass over a specific protocol (HTTP, HTTPS, or any). If we secure the JBCP Pets site in this way, the configuration would be as follows:
1 | <http auto-config="true" use-expressions="true"> |
2 | <intercept-url pattern="/login.do" access="permitAll" |
3 | requires-channel="https"/> |
4 | <intercept-url pattern="/account/*.do" |
5 | access="hasRole('ROLE_USER') and fullyAuthenticated" |
6 | requires-channel="https"/> |
7 | <intercept-url pattern="/*" access="permitAll" |
8 | requires-channel="any"/> |
If we start the application at this point, we see the following behavior:
- Access to the login page and the account page, now requires HTTPS,and the browser will automatically redirect the user from the non-secure
(HTTP) URL to the secure URL. For example, attempts to access http://localhost:8080/JBCPPets/login.do will be redirected to https://localhost:8443/JBCPPets/login.do. - Once the user has been switched to the HTTPS-secured URL, if he accesses a URL that isn’t required to use HTTPS, he can still remain on HTTPS.
We can imagine that the important security benefits of this type of configuration— most modern application servers use the secure indicator on session cookies, so enforcing the login page to be secure (if this is where your application’s sessions are first allocated) will ensure that the session cookie is transferred securely, and is less subjected to session hijacking. Additionally, this wires rules about SSL encryption directly into your security declarations, so it’s very easy to ensure that all sensitive pages in the application are properly and thoroughly secured.
The functionality of automatically redirecting users to the appropriate protocol (HTTP or HTTPS) is implemented by the addition of another servlet filter towards the front of the Spring Security filter chain (just after the SecurityContextPersistenceFilter). The o.s.s.web.access.channel.ChannelProcessingFilter is automatically placed in the filter chain if any URL declarations are indicated to require a particular protocol, using the requires-channel attribute.
The interaction of the ChannelProcessingFilter in the processing of the request is illustrated in the following figure:
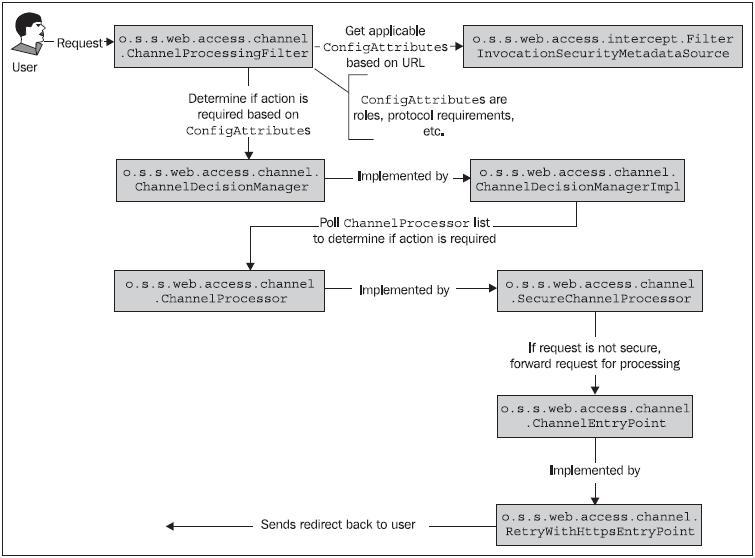 The design of the ChannelProcessingFilter lends itself to extension or augmentation, should your application require more complex logic than ships out of the box. Please note that although we illustrate only the SecureChannelProcessor and RetryWithHttpsEntryPoint implementation classes in the diagram, similar classes exist to validate and act on URLs that are declared to require HTTP.
It’s important to note that, since the ChannelEntryPoint performs simple URL rewriting with an HTTP 302 redirect, it is of course not possible to use this technique to redirect POST URLs (although typically a POST should not transition between secure and insecure protocols anyway, since most browsers will warn against
this behavior).
Secure port mapping
Certain environments may have HTTP or HTTPS ports other than the standard defaults of 80/443 or 8080/8443. In this case, you must augment your application’s configuration to include explicit port mappings, so that the ChannelEntryPoint implementations can determine which port to use when redirecting users to secure or non-secure URLs.
This is trivial to do with the additional configuration element , which allows for specification of additional HTTP or HTTPS pairs in addition
to the defaults:
2 | <port-mapping http="9080" https="9443"/> |
The use of port mappings can be especially important if your application server is behind a reverse proxy.
Summary
In this chapter, we have:
- Introduced the configuration to support a permanent security data store
using a JDBC-compatible database. - Configured JBCP Pets to use the database for user authentication and highly secure password storage, using password encryption and salting techniques.
- Evaluated techniques for managing users persisted to a database using JDBC.
- Configured user assignment into security groups, conferring roles, rather than direct role assignment. This increases the manageability of the site and
its user community. - Explored the use of Spring Security with a legacy (non-default) database schema.
- Examined configuration and application design techniques used to incorporate HTTPS to increase the security of data transferred to and from
secured areas of the application.
In the next chapter, we’ll explore some more advanced authorization capabilities of Spring Security, and introduce the Spring Security JSP tag library for fine-grained authorization.
also read:
위 게시물에 대한 번역판도 있네요. ㅎㅎ 좋은세상. 감사히 잘보겠슴다.
http://springsource.tistory.com/77
http://springsource.tistory.com/80
http://springsource.tistory.com/94
보안이 적용되지 않은 간단한 웹 어플리케이션 생성
1. New > Other > Maven Project

2. maven-archetype-webapp 선택

3. 메이븐 프로젝트 설정

4. Finish 선택
5. 이 웹 어플리케이션을 배포해서 정상적으로 동작하는 지 확인해 보자. 다음과 같이 페이지가 나타나야 한다.

웹 어플리케이션에 Spring Security 적용
이제 위에서 개발한 Hello World 웹 어플리케이션에 Spring Security 를 적용해 보자.
1. pom.xml 을 다음과 같이 수정한다.
1 2 3 4 5 6 7 8 9 10 11 12 13 14 15 16 17 18 19 20 21 22 23 24 25 26 27 28 29 30 31 32 33 34 35 | <project xmlns="http://maven.apache.org/POM/4.0.0" xmlns:xsi="http://www.w3.org/2001/XMLSchema-instance"
xsi:schemaLocation="http://maven.apache.org/POM/4.0.0 http://maven.apache.org/maven-v4_0_0.xsd">
<modelVersion>4.0.0</modelVersion>
<groupId>com.happyhouse.rednics</groupId>
<artifactId>spring-security-tutorial</artifactId>
<packaging>war</packaging>
<version>0.0.1-SNAPSHOT</version>
<name>spring-security-tutorial Maven Webapp</name>
<url>http:
<dependencies>
<dependency>
<groupId>commons-logging</groupId>
<artifactId>commons-logging</artifactId>
<version>1.1.1</version>
</dependency>
<dependency>
<groupId>org.springframework.security</groupId>
<artifactId>spring-security-core</artifactId>
<version>3.1.0.RELEASE</version>
</dependency>
<dependency>
<groupId>org.springframework.security</groupId>
<artifactId>spring-security-web</artifactId>
<version>3.1.0.RELEASE</version>
</dependency>
<dependency>
<groupId>org.springframework.security</groupId>
<artifactId>spring-security-config</artifactId>
<version>3.1.0.RELEASE</version>
</dependency>
</dependencies>
<build>
<finalName>spring-security-tutorial</finalName>
</build>
</project>
|
spring-webmvc 를 넣어주지 않을 경우 ApplicationContext 초기화시에 commons.logging
2. web.xml 을 다음과 같이 수정한다.
1 2 3 4 5 6 7 8 9 10 11 12 13 14 15 16 17 18 19 20 21 22 23 24 | <!DOCTYPE web-app PUBLIC
"-//Sun Microsystems, Inc.//DTD Web Application 2.3//EN"
"http://java.sun.com/dtd/web-app_2_3.dtd" >
<web-app>
<context-param>
<param-name>contextConfigLocation</param-name>
<param-value>/WEB-INF/spring-security-context.xml</param-value>
</context-param>
<filter>
<filter-name>springSecurityFilterChain</filter-name>
<filter-class>org.springframework.web.filter.DelegatingFilterProxy</filter-class>
</filter>
<filter-mapping>
<filter-name>springSecurityFilterChain</filter-name>
<url-pattern>/*</url-pattern>
</filter-mapping>
<listener>
<listener-class>org.springframework.web.context.ContextLoaderListener</listener-class>
</listener>
</web-app>
|
3. WEB-INF 폴더에 spring-security-context.xml 파일을 다음과 같이 작성한다.
1 2 3 4 5 6 7 8 9 10 11 12 13 14 15 16 17 18 19 20 21 22 | <?xml version="1.0" encoding="UTF-8"?>
<beans xmlns="http://www.springframework.org/schema/beans"
xmlns:xsi="http://www.w3.org/2001/XMLSchema-instance"
xmlns:security="http://www.springframework.org/schema/security"
xsi:schemaLocation="http:
http:
http:
http:
<security:http auto-config="true">
<security:intercept-url pattern="/favicon.ico" access="ROLE_ANONYMOUS" />
<security:intercept-url pattern="/**" access="ROLE_USER" />
</security:http>
<security:authentication-manager>
<security:authentication-provider>
<security:user-service>
<security:user name="guest" password="guest" authorities="ROLE_USER" />
</security:user-service>
</security:authentication-provider>
</security:authentication-manager>
</beans>
|
4. 이제 이 프로젝트를 배포한 후 브라우저에 http://xxx:8080 과 같이 입력해보자. "Hello World" 페이지가 나오지 않고 아이디와 패스워드를 입력하라는 화면이 나온다. Hello World 페이지에 보안이 걸렸기 때문이다. 이제 guest / guest 를 입력하고 로그인 버튼을 입력해 보자.

5. 우리가 원했던 Hello World 페이지가 보일 것이다.

web.xml 과 spring-security-context.xml 설정의 이해
web.xml 설정의 이해
web.xml 설정을 다시 적어 보자.
1 2 3 4 5 6 7 8 9 10 11 12 13 14 15 16 17 18 19 20 21 22 23 24 | <!DOCTYPE web-app PUBLIC
"-//Sun Microsystems, Inc.//DTD Web Application 2.3//EN"
"http://java.sun.com/dtd/web-app_2_3.dtd" >
<web-app>
<context-param>
<param-name>contextConfigLocation</param-name>
<param-value>/WEB-INF/spring-security-context.xml</param-value>
</context-param>
<filter>
<filter-name>springSecurityFilterChain</filter-name>
<filter-class>org.springframework.web.filter.DelegatingFilterProxy</filter-class>
</filter>
<filter-mapping>
<filter-name>springSecurityFilterChain</filter-name>
<url-pattern>/*</url-pattern>
</filter-mapping>
<listener>
<listener-class>org.springframework.web.context.ContextLoaderListener</listener-class>
</listener>
</web-app>
|
위 설정은 ContextLoaderListener 를 사용해서 spring-security-context.xml 파일로부터 루트 어플리케이션 컨텍스트를 생성하고 있다. 위 설정은 별도의 서블릿 컨텍스트 설정파일을 사용하지 않는다.
다음으로 모든 요청 URL(/*) 에 DelegatingFilterProxy 필터를 적용하고 있다. 사실 DelegatingFilterProxy는 보안과 직접적인 관련은 없다. DelegatingFilerProxy 필터의 이름으로 springSecurityFilterChain 을 설정해줬다. 따라서 DelegatingFilterProxy는 spring-security-context.xml 을 통해 등록된 빈 중에 이름이 springSecurityFilterChain 인 빈을 참조하게 된다. 이렇게 DelegatingFilterProxy 와 Spring Security 가 연결되게 된다.
DelegatingFilterProxy는 어플리케이션 컨텍스트에 정의된 springSecurityFilterChain 으로 필터링 작업을 위임하는 역할이 전부이다.
spring-security-context.xml 설정의 이해
spring-security-context.xml 설정을 다시 적어 보자
1 2 3 4 5 6 7 8 9 10 11 12 13 14 15 16 17 18 19 20 21 22 | <?xml version="1.0" encoding="UTF-8"?>
<beans xmlns="http://www.springframework.org/schema/beans"
xmlns:xsi="http://www.w3.org/2001/XMLSchema-instance"
xmlns:security="http://www.springframework.org/schema/security"
xsi:schemaLocation="http:
http:
http:
http:
<security:http auto-config='true'>
<security:intercept-url pattern="/favicon.ico" access="ROLE_ANONYMOUS" />
<security:intercept-url pattern="/**" access="ROLE_USER" />
</security:http>
<security:authentication-manager>
<security:authentication-provider>
<security:user-service>
<security:user name="guest" password="guest" authorities="ROLE_USER" />
</security:user-service>
</security:authentication-provider>
</security:authentication-manager>
</beans>
|
auto-config="true" 설정에 의해 Spring Security 는 10개의 스프링 필터로 필터 체인을 구성한다. 필터의 연결 순서와 각 역할은 다음과 같다.
SecurityContextPersistenceFilter
SecurityContextRepository 에서 SecurityContext 를 로딩하거나 SecurityContextRepository 로 SecurityContext 를 저장하는 역할을 한다.SecurityContext 란 사용자의 보호및 인증된 세션을 의미한다.
LogoutFilter
로그아웃 URL(디폴트 값 : /j_spring_security_logout) 로의 요청을 감시하여 해당 사용자를 로그아웃 시킨다.
UsernamePasswordAuthenticationFilter
username 과 password 를 사용하는 폼기반 인증 요청 URL(디폴트 값: /j_spring_security_check) 을 감시하여 사용자를 인증하는 역할을 한다.
DefaultLoginPageGeneratingFilter
폼또는 OpenID 기반 인증을 위한 로그인폼 URL(디폴트 값: /spring_security_login)을 감시하여 로그인폼을 생성한다.
BasicAuthenticationFilter
HTTP 기본 인증 헤더를 감시하여 처리한다.
RequestCacheAwareFilter
로그인 성공 후, 원래 요청 정보를 재구성하기 위해 사용됨
SecurityContextHolderAwareRequestFilter
HttpServletRequestWrapper 를 상속한 SecurityContextHolderAwareRequestWapper 클래스로 HttpServletRequest 정보를 감싼다. SecurityContextHolderAwareRequestWrapper 클래스는 필터 체인상의 다음 필터들에게 추가 정보를 제공한다.
AnonymousAuthenticationFilter
이 필터가 호출되는 시점까지 사용자 정보가 인증되지 않았다면 사용자가 익명이라는 것 나타내는 인증토큰이 요청과 관련지어 진다.
SessionManagementFilter
이 필터는 하나의 인증된 사용자와 관련된 모든 세션을 추적하고, 인증된 사용자 정보를 기반으로 세션을 추적을 처리한다.
ExceptionTranslationFilter
이 필터는 보호된 요청을 처리하는 중에 발생하는 예상된 예외를 위임하거나 전달하는 역할을 한다.
FilterSecurityInterceptor
이 필터는 AccessDecisionManager 로 인증에 대한 결정권을 위임함으로써 인증허가 및 접근제어 결정을 용이하게 한다.
Spring Security는 대략 25개의 필터를 제공한다. 이런 필터들은 모두 사용자 요청을 수정한다던지 하는 경우에 조건적으로 적용될 수 있다. 물론 javax.servlet.Filter 인터페이스를 직접 구현해서 추가할 수도 있다. 위에 나열한 필터들은 auto-config 어트리뷰트를 설정했을 때 자동으로 구성되는 필터들이라는 것을 기억하기 바란다. 위에 나열된 필터들은 명시적으로 포함시키거나 제외시킬 수 있다.
처음부터 모든 필터체인을 하나 하나 구성할 수도 있다. 이 방식으로 구성한다는 것은 연결해야할 의존성이 많기 때문에 다소 지루할 수도 있지만 각 어플리케이션에 적합하고도 유연한 설정을 제공할 수 있다.
맛보기 치고는 설명이 좀 길었던 것 같다.
부족한 부분은 Spring Security 문서를 참고하도록 하자
Spring Security의 요청 처리 절차
Spring Security 는 주로 서블릿 필터와 이들로 구성된 필터체인으로의 위임모델을 사용한다. 서블릿 필터는 사용자의 요청을 가로채서 전처리 하거나 서버의 응답을 가로채서 후처리할 수 있다.

Spring Security 네임스페이스가 제공하는 http 엘리먼트의 auto-config 어트리뷰트를 사용하면, Spring Security 는 일련의 필터체인을 구성한다. 사용자 요청이 이러한 필터체인 내에서 처리되는 과정을 요약하면 다음과 같다.

자동설정으로 구성되는 필터체인에는 10개의 필터가 존재한다. 각 필터의 순서와 기능을 간단히 요약하면 다음과 같다.
1. SecurityContextPersistenceFilter
SecurityContextRepository 에서 SecurityContext 를 로딩하거나 SecurityContextRepository 로 SecurityContext 를 저장하는 역할을 한다.SecurityContext 란 사용자의 보호및 인증된 세션을 의미한다.
2. LogoutFilter
로그아웃 URL(디폴트 값 : /j_spring_security_logout) 로의 요청을 감시하여 해당 사용자를 로그아웃 시킨다.
3. UsernamePasswordAuthenticationFilter
아이디와 비밀번호를 사용하는 폼기반 인증 요청 URL(디폴트 값: /j_spring_security_check) 을 감시하여 사용자를 인증하는 역할을 한다.
4. DefaultLoginPageGeneratingFilter
폼또는 OpenID 기반 인증을 위한 로그인폼 URL(디폴트 값: /spring_security_login)을 감시하고 이와 관련된 로그인폼을 생성한다.
5. BasicAuthenticationFilter
HTTP 기본 인증 헤더를 감시하여 처리한다.
6. RequestCacheAwareFilter
로그인 성공 후, 원래 요청 정보를 재구성하기 위해 사용된다.
7. SecurityContextHolderAwareRequestFilter
HttpServletRequestWrapper 를 상속한 SecurityContextHolderAwareRequestWapper 클래스로 HttpServletRequest 정보를 감싼다. SecurityContextHolderAwareRequestWrapper 클래스는 필터 체인상의 다음 필터들에게 부가정보를 제공한다.
8. AnonymousAuthenticationFilter
이 필터가 호출되는 시점까지 사용자 정보가 인증되지 않았다면 인증토큰에 사용자가 익명 사용자로 나타난다.
9. SessionManagementFilter
이 필터는 인증된 사용자와 관련된 모든 세션을 추적한다.
10. ExceptionTranslationFilter
이 필터는 보호된 요청을 처리하는 중에 발생할 수 있는 예외를 위임하거나 전달하는 역할을 한다.
11. FilterSecurityInterceptor
이 필터는 AccessDecisionManager 로 권한부여 처리를 위임함으로써 접근 제어 결정을 쉽게해준다.
Spring Security는 대략 25개의 필터를 제공한다. 이런 필터들은 모두 조건적으로 적용될 수 있다. 물론 javax.servlet.Filter 인터페이스를 직접 구현해서 추가할 수도 있다. 위에 나열한 필터들은 auto-config 어트리뷰트를 설정했을 때 자동으로 구성되는 필터들이라는 것을 기억하자. 위에 나열된 필터들을 명시적으로 포함시키거나 제외시킬 수도 있다.
처음부터 모든 필터체인을 하나 하나 구성할 수도 있다. 이 방식으로 구성한다는 것은 연결해야할 의존성이 많기 때문에 다소 지루할 수도 있지만 각 어플리케이션에 적합하고도 유연한 설정을 제공할 수 있다.
Spring Security 를 적용하기 위해 web.xml 에 설정하는 DelegatingFilterProxy 필터는 어떻게 Spring Security 가 설정한 필터체인과 연결되는 것일까?
DelegatingFilterProxy 를 설정하는 web.xml 을 다시 살펴보자.
1 2 3 4 | <filter>
<filter-name>springSecurityFilterChain</filter-name>
<filter-class>org.springframework.web.filter.DelegatingFilterProxy</filter-class>
</filter>
|
위의 설정에서 filter-name 에 설정된 springSecurityFilterChain 이라는 이름은 그냥 아무렇게나 지은 것이 아니다. 사실 Spring Security 는 자기 자신을 DelegatingFilterProxy 와 연결하기 위해서 springSecurityFilterChain 라는 필터 이름을 요구한다.
auto-config 가 몰래 하는 짓
Spring Security 3 에서 auto-config 를 사용하면 다음과 같은 세 가지의 인증관련 기능을 자동적으로 제공한다.
HTTP basic Authentication
Form login authentication
Logout
auto-config 가 제공하는 기본 설정보다 좀 더 상세한 설정을 원할 경우라면 각각의 엘리먼트를 직접 선언할 수도 있다.
사용자 인증
사용자가 로그인 화면에서 제공한 비밀번호는 보안 시스템상에서 다음단계로 넘어가기 전에 비밀번호 저장소를 통해 인증되어야 한다. 비밀번호 인증과정에서 인증이라는 공통 기능을 담은 일련의 컴포넌트들이 사용된다.
인증관련 컴포넌트들을 정리하면 대략 다음과 같다.

위 다이어그램에는 3개의 주요 컴포넌트가 있다.
AbstractAuthenticationProcessingFilter
웹 기반 인증요청에서 사용되는 컴포넌트로 POST 폼 데이터를 포함하는 요청을 처리한다. 사용자 비밀번호를 다른 필터로 전달하기 위해서 Authentication 객체를 생성하고 일부 프로퍼티를 설정한다.
AuthenticationManager
사용자 비밀번호를 인증하는 역할을 담당한다. 인증에 실패하면 예외를 던지기도 하고 성공하면 Authentication 객체의 모든 프로퍼티를 완성한다. 이렇게 Authentication 객체에 채워지는 값에는 권한정보도 포함되어 있다.
AuthenticationProvider
AuthenticationManager 에게 비밀번호 인증기능을 제공하는 역할을 한다. 어떤 AuthenticationProvider 구현체들은 데이터베이스와 같은 비밀번호 저장소를 참고하여 비밀번호를 인증하기도 한다.
Authentication 이라는 인터페이스는 우리가 자주 사용하게 될 것이다. 이 인터페이스는 사용자 식별자와 비밀번호, 마지막으로 사용자에게 부여된 하나 또는 그 이상의 권한정보 등에 대한 상세정보를 가지고 있다. 개발자들은 인증된 사용자에 대한 상세 정보가 필요할 경우 보통 Authentication 오브젝트를 사용하게 될 것이다.
Authentication 인터페이스가 제공하는 메소드는 다음과 같다.
Object getPrincipal() : 사용자 아이디를 리턴한다.
Object getCredentials() : 사용자 비밀번호를 리턴한다.
List<GrantedAuthority> getAuthorities() : Authentication 저장소에 의해 인증된 사용자의 권한 목록을 리턴한다.
Object getDetails() : 인증 프로바이더에 종속적인 사용자의 상세정보를 리턴한다.
Spring Security 는 ProviderManager 라는 AuthenticationManager 인터페이스의 유일한 구현체를 제공한다. ProviderManager 는 하나 또는 여러 개의 AuthenticationProvider 구현체를 사용할 수 있다. AuthenticationProvider는 많이 사용되고 ProviderManager(AuthenticationManager 의 구현체) 와도 잘 통합되기 때문에 기본적으로 어떻게 동작하는 지 이해하는 것이 중요하다.
웹기반 사용자 아이디- 패스워드 인증 요청 처리관련 클래스들은 다음과 같이 도식화할 수 있다.

spring_security_login 으로 리다이렉트하네?
auto-config 에 의해 자동으로 Spring Security 가 적용된 페이지로 접속을 시도하면 다음 화면과 같이 spring_security_login 이라는 URL 로 리다이렉트 할 것이다.

URL의 spring_security_login 이라는 부분은 DefaultLoginPageGeneratingFilter 클래스가 정의한 디폴트 로그인 페이지 URL이다. 이 URL은 어트리뷰트 설정으로 변경가능하다.
이 폼의 HTML 소스를 살펴보자.
1 2 3 4 5 6 7 | <form name='f' action='/JBCPPets/j_spring_security_check'
method='POST'>
User : <input type='text' name='j_username' value=''/>
Password : <input type='password' name='j_password' />
<input name="submit" type="submit"/>
<input name="reset" type="reset"/>
</form>
|
우선 우리가 전혀 설정하지 않은 j_username 이나 j_password 와 같은 필드들과 j_spring_security_check 라는 폼 서브밋 URL 이 보인다. 이런 것들은 어떻게 생긴 것일까?
j_username 과 j_password 라는 폼 필드명과 j_spring_security_check 라는 폼 서브밋 URL은 UsernamePasswordAuthenticationFilter 가 디폴트로 지정한 이름들이다. UsernamePasswordAuthenticationFilter 를 명시적으로 설정해서 명칭들을 모두 변경할 수도 있다.
UsernamePasswordAuthenticationFilter 는 <form-login> 이라는 <http> 의 서브 엘리먼트로 설정할 수 있다.
비밀번호 인증
Spring Security 3 - 맛보기와 기본설정의 이해 의 authentication-manager 엘리먼트 설정 부분을 다시 살펴보자.
1 2 3 4 5 6 7 | <security:authentication-manager>
<security:authentication-provider>
<security:user-service>
<security:user name="guest" password="guest" authorities="ROLE_USER" />
</security:user-service>
</security:authentication-provider>
</security:authentication-manager>
|
위 설정은 메모리 비밀번호 저장소를 사용하고 있고 AuthenticationProvider 를 어떤 구현체로도 명시적으로 연결하고 있지 않다. AuthenticationManager 는 하나 또는 그 이상의 AuthenticationProvider 설정을 지원한다 것을 기억하자. 위 설정의 <authentication-provider> 엘리먼트는 디폴트로 DaoAuthenticationProvider 라는 AuthenticationProvider 인터페이스의 구현체를 사용하고 있으며 AuthenticationProvider 를 AuthenticationManager 로 자동 연결하고 있다.
DaoAuthenticationProvider 는 UserDetailsService 타입 오브젝트로 위임한다. UserDetailsService 는 UserDetails 구현체를 리턴하는 역할을 한다.
UserDetails 인터페이스는 이전에 설명한 Authentication 인터페이스와 상당히 유사하지만 서로 다른 목적을 가진 인터페이스이므로 혼돈하지 않도록 하자.
Authentication : 사용자 ID, 패스워드와 인증 요청 컨텍스트에 대한 정보를 가지고 있다. 인증 이후의 사용자 상세정보와 같은 UserDetails 타입 오브젝트를 포함할 수도 있다.
UserDetails : 이름, 이메일, 전화번호와 같은 사용자 프로파일 정보를 저장하기 위한 용도로 사용한다.
위 설정의 <user-service> 엘리먼트는 UserDetailsService 의 구현체인 InMemoryDaoImpl 를 사용하게 한다. InMemoryDaoImpl 구현체는 설정파일의 사용자 정보를 메모리 저장소에 저장한다.
DaoAuthenticationProvider 가 AuthenticationManager 에게 어떻게 인증처리를 지원하는지 지금까지 설명한 내용을 도식화해보면 다음과 같다.

인증 예외
인증과 관련된 모든 예외는 AuthenticationException 을 상속한다. AuthenticationException 은 개발자에게 상세한 디버깅 정보를 제공하기위한 두개의 멤버 필드를 가지고 있다.
authentication : 인증 요청관련 Authentication 객체를 저장하고 있다.
extraInformation : 인증 예외 관련 부가 정보를 저장한다. 예를 들어 UsernameNotFoundException 예외는 인증에 실패한 유저의 id 정보를 저장하고 있다.
가장 일반적인 예외는 다음과 같다.
BadCredentialsException : 사용자 아이디가 전달되지 않았거나 인증 저장소의 사용자 id 에 해당하는 패스워드가 일치하지 않을 경우 발생한다.
LockedException : 사용자 계정이 잠긴경우 발생한다.
UsernameNotFoundException : 인증 저장소에서 사용자 ID를 찾을 수 없거나 사용자 ID에 부여된 권한이 없을 경우 발생한다.
접근권한 부여
자동으로 설정된 Spring Security 필터 체인의 마지막 서블릿 필터는 FilterSecurityInterceptor 이다. 이 필터는 해당 요청의 수락 여부를 결정한다. FilterSecurityInterceptor 가 실행되는 시점에는 이미 사용자가 인증되어 있을 것이므로 유효한 사용자인지도 알 수 있다. Authentication 인터페이스에는 List<GrantedAuthority> getAuthorities() 라는 메소드가 있다는 것을 상기해 보자. 이 메소드는 사용자 아이디에 대한 권한 목록을 리턴한다. 권한처리시에 이 메소드가 제공하는 권한정보를 참조해서 해당 요청의 승인 여부를 결정하게 된다.
Access Decision Manager 라는 컴포넌트가 인증 확인을 처리한다. AccessDecisionManager 인터페이스는 인증 확인을 위해 두 가지 메소드를 제공한다.
supports : AccessDecisionManager 구현체는 현재 요청을 지원하는지의 여부를 판단하는 두개의 메소드를 제공한다. 하나는 java.lang.Class 타입을 파라미터로 받고 다른 하나는 ConfigAttribute 타입을 파라미터로 받는다.
decide : 이 메소드는 요청 컨텍스트와 보안 설정을 참조하여 접근 승인여부를 결정한다. 이 메소드에는 리턴값이 없지만 접근 거부를 의미하는 예외를 던져 요청이 거부되었음을 알려준다.
인증과정에서 발생할 수 있는 예상 가능한 에러를 처리하는 AuthenticationException 과 하위 클래스를 사용했던 것처럼 특정 타입의 예외 클래스들을 사용하면 권한처리를 하는 애플리케이션의 동작을 좀더 세밀하게 제어할 수 있다.
AccessDecisionManager 는 표준 스프링 빈 바인딩과 레퍼런스로 완벽히 설정할 수 있다.디폴트 AccessDecisionManager 구현체는 AccessDecisionVoter 와 Vote 취합기반 접근 승인 방식을 제공한다.
Voter 는 권한처리 과정에서 다음 중 하나 또는 전체를 평가한다.
■ 보호된 리소스에 대한 요청 컨텍스트 (URL 을 접근하는 IP 주소)
■ 사용자가 입력한 비밀번호
■ 접근하려는 리소스
■ 시스템에 설정된 파라미터와 리소스
AccessDecisionManager 는 요청된 리소스에 대한 access 어트리뷰트 설정을 보터에게 전달하는 역할도 하므로 보터는 웹 URL 관련 access 어트리뷰트 설정 정보를 가지게 된다. 기본 설정 파일의 URL 인터셉트 설정을 보면 사용자가 접근하려는 리소스에 대한 access 어트리뷰트 설정값으로 ROLE_USER 가 사용되고 있다.
<intercept-url pattern="/*" access="ROLE_USER" />
Voter는 사용할 수 있는 정보를 사용해서 사용자의 리소스에 대한 접근 허가 여부를 판단한다. 보터는 접근 허가 여부에 대해서 세 가지 중 한 가지로 결정하는데, 각 결정은 AccessDecisionVoter 인터페이스에 다음과 같이 상수로 정의되어 있다.
Grant(ACCESS_GRANTED) : Voter 가 리소스에 대한 접근 권한을 허가하도록 권장한다.
Deny(ACCESS_DENIED) : Voter 가 리소스에 대한 접근 권한을 거부하도록 권장한다.
Abstain(ACCESS_ABSTAIN) : Voter 는 리소스에 대한 접근권한 결정을 보류한다. 이 결정 보류는 다음과 같은 경우에 발생할 수 있다.
- Voter 가 접근권한 판단에 필요한 결정적인 정보를 가지고 있지 않은 경우
- Voter 가 해당 타입의 요청에 대해 결정을 내릴 수 없는 경우
접근권한 결정관련 오브젝트와 인터페이스의 설계내용을 보면 알겠지만 Spring Security 의 이런 부분들은 웹 어플리케이션 내의 인증과 접근제어에만 사용할 수 있는 것은 아니다.
지금까지의 내용을 종합해보면 "웹 요청에 대한 디폴트 인증 확인" 절차는 다음과 같이 도식화할 수 있다.

위 그림을 보면 ConfigAttribute 를 추상화함으로써 관련 클래스들이 ConfigAttribute 의 내용을 알 필요 없이 xml로 설정한 데이터(DefaultFilterInvocationSecurityMetadataSource 오브젝트에 보관된)를 ConfigAttribute 에 따라 동작하는 voter 로 전달할 수 있다는 것을 알 수 있을 것이다. 이와 같은 관심사의 분리는 동일 접근권한 결정 패턴을 사용해 새로운 유형의 보안 설정을 개발하는데 있어 견고한 기반을 제공하고 있다.
접근권한 결정 취합 설정
Spring Security 에서는 security 네임스페이스가 제공하는 엘리먼트로 AccessDecisionManager 를 설정할 수 있다.<http> 엘리먼트의 access-decision-manager-ref 어트리뷰트에 AccessDecisionManager 를 구현한 빈의 레퍼런스를 설정하면 된다. Spring Security 는 이 인터페이스를 구현한 3개의 구현체를 제공하는데 모두 org.springframework.security.access.vote 패키지에 존재한다.
AffirmativeBased : 접근을 승인하는 voter 가 하나라도 존재하면 이전의 접근 거부사실과 관계없이 바로 접근이 승인된다.
ConsensusBased : 다득표 여부가 AccessDecisionManager 의 접근 승인여부를 결정한다. 동률 또는 무효표에 처리에 대해서는 설정 가능하다.
UnanimouseBased : 모든 voter 가 접근을 승인해야 최종적인 접근이 승인된다.
UnanimouseBased 접근승인 방식 설정
지금까지 사용했던 기본 설정에 UnanimouseBased 접근승인 방식을 적용하려면 2가지를 수정해야 한다. 엘리먼트의 access-decision-manager-ref 어트리뷰트를 설정하고 관련 빈을 다음과 같이 추가하면 된다.
1 2 3 4 5 6 7 8 9 10 11 12 13 14 15 | <security:http auto-config="true" access-decision-manager-ref="unanimouseBased">
<security:intercept-url pattern="/**" access="ROLE_USER" />
</security:http>
<bean id="unanimouseBased" class="org.springframework.security.access.vote.UnanimousBased">
<property name="decisionVoters">
<list>
<ref bean="roleVoter" />
<ref bean="authenticatedVoter" />
</list>
</property>
</bean>
<bean id="roleVoter" class="org.springframework.security.access.vote.RoleVoter" />
<bean id="authenticatedVoter" class="org.springframework.security.access.vote.AuthenticatedVoter" />
|
decisionVoters 프로퍼티는 커스텀 AccessDecisionManager 를 선언하기 전까지 자동으로 설정된다. 디폴트 AccessDecisionManager 에는 최종 인증 확인 절차에 사용할 voter 목록을 설정해줘야 한다. 위 설정에 적용된 2개의 voter 는 security 네임스페이스가 제공하는 디폴트 voter 들이다.
아쉽게도 Spring Security가 다양한 voter 를 제공하지는 않지만 AccessDecisionVoter 인터페이스를 구현해서 커스텀 voter 를 추가하는 것은 어렵지 않다.
위에 설정한 2개의 voter 가 하는 일은 다음과 같다.
RoleVoter : 리소스에 설정된 Role과 부합하는 접근권한(GrantedAuthority) Role 이 사용자에게 부여되어 있는지 확인한다. access 어트리뷰트는 콤마로 구분된 접근권한 Role 명칭들을 가질 수 있다. Role 명칭들은 디폴트로 ROLE_ 로 시작되어야 하지만 변경할 수 있다.
예) access="ROLE_USER, ROLE_ADMIN"
AuthenticatedVoter : 와일드 카드와 같은 특수 설정을 지원한다.
● IS_AUTHENTICATED_FULLY : 새로운 사용자 아이디와 비밀번호가 입력된 경우 접근을 승인한다.
● IS_AUTHENTICATED_REMEMBERED : 사용자가 remember me 기능을 사용해 인증한 경우 접근을 승인한다.
● IS_AUTHENTICATED_ANONYMOUSLY : 사용자가 익명 사용자인 경우 접근을 승인한다.
예) access="IS_AUTHENTICATED_ANONYMOUSLY"
스프링 표현식을 사용한 접근 설정
RoleVoter 로 구현되는 표준 Role 기반 방식 대신 SpEL(Spring Expression Language) 을 사용해서 복잡한 vote 규칙을 정의할 수도 있다. 이 방식을 사용하려면 <http> 엘리먼트에 use-expressions 어트리뷰트를 다음과 같이 설정해 주면 된다.
1 2 | <security:http auto-config="true" use-expressions="true">
</textare a></p>
|
use-expressions 어트리뷰트를 추가하게 되면 intercept-url 엘리먼트의 access 어트리뷰트의 동작방식이 바뀌어 SpEL 표현식을 사용해줘야 한다. ROLE_USER 와 같은 간단한 문구대신 메소드를 호출하거나 시스템 프로퍼티를 참조하거나 값을 연산하는 등의 표현식을 사용할 수 있는 것이다.
use-expressions 어트리뷰트를 사용해 SpEL 표현식 기반의 접근 규칙을 설정할 때 주의할 점은 RoleVoter 자동설정 기능을 사용하지 말아야 한다는 것이다. 즉, 단순히 Role 정보에 의해 접근을 제어하기 원한다면 이전의 access 어트리뷰트 설정은 수정되어야 한다는 것이다. 다행히 SpEL에 포함된 hasRole 이라는 메소드가 Role 을 체크할 수 있다.
이전의 access 설정을 표현식을 사용하도록 수정하면 다음과 같다.
1 2 3 4 | <security:http auto-config="true" use-expressions="true">
<security:intercept-url pattern="/**" access="hasRole('ROLE_USER')" />
</security:http>
</textare a></p>
|
SpEL 표현식을 사용한 접근제어는 SpEL 표현식을 어떻게 처리할지 알고 있는 WebExpressionVoter 라는 Voter 구현체에 의해 처리된다. WebExpressionVoter 는 이런 기능을 담당하기 위해 WebSecurityExpressionHandler 인터페이스의 구현체의 의존한다. WebSecurityExpressionHandler 는 표현식을 해석하고 표현식에서 사용가능한 보안관련 메소드를 제공하는 역할을 한다. 이 인터페이스의 기본 구현체는 WebSecurityExpressionRoot 클래스에 정의되어 있는 메소드를 노출시킨다.
이 클래스들 간의 흐름과 관계는 다음과 같이 도식화할 수 있다.

SpEL 접근제어 표현식에서 사용할 수 있는 메소드와 가상 프로퍼티(pseudo-property)들은 WebSecurityExpressionRoot 클래스나 이 클래스의 상위 클래스가 제공하는 public 메소드가 정의하고 있다.
가상 프로퍼티란 파라미터를 받지 않는 메소드로서 getter 를 위한 자바빈 명명 관례를 따르는 메소드를 말한다. 이러한 특징때문에 SpEL 표현식에서 사용되는 메소드는 중괄호, is 또는 get 과 같은 접두어를 생략할 수 있는 것이다.
스프링 시큐리티 3에 포함된 SpEL 메소드와 가상 프로퍼티는 다음과 같다.
hasIpAddress(ipAddress) : 특정 IP 주소 또는 넷마스크를 포함하는 IP 주소와의 일치성을 비교한다. 웹 전용이다.
사용 예) access="hasIpAddress('162.79.8.30')" 또는 access="hasIpAddress('162.0.0.0/224')"
hasRole(role) : RoleVoter 설정과 유사하며 Role 과 GrantedAuthority 와의 일치성을 비교한다. 웹 전용은 아니다.
사용 예) access="hasRole('ROLE_USER')"
hasAnyRole(role) : GrantedAuthority 와 Role 목록중 일치되는 Role 이 있는지 비교한다. 웹 전용은 아니다.
사용 예) access="hasRole('ROLE_USER', 'ROLE_ADMIN')"
이러한 SpEL 용 메소드 외에 SpEL 표현식에서 속성처럼 사용할 수 있는 다양한 메소드도 사용할 수 있는데 이러한 메소드들은 중괄호나 메소드 파라미터가 필요하지 않다.
permitAll : 모든 사용자의 접근을 허가한다. 웹 전용은 아니다.
사용 예) access="permitAll"
denyAll : 모든 사용자의 접근을 거부한다. 웹 전용은 아니다.
사용 예) access="denyAll"
anonymous : 익명사용자에게 접근을 허가한다. 웹 전용은 아니다.
사용 예) access="anonymous"
authenticated : 인증된 사용자에게만 접근을 허가한다. 웹 전용은 아니다.
사용 예) access="authenticated"
rememberMe : Remember Me 기능으로 인증된 사용자에게만 접근을 허가한다. 웹 전용은 아니다.
사용 예) access="rememberMe"
fullyAuthenticated : 완전한 크리덴셜로 인증된 사용자에게만 접근을 허가한다. 웹 전용은 아니다.
사용 예) access="fullyAuthenticated"
Voter 구현체는 요청 정보를 파악해서 접근허가, 거부, 보류 등의 결정된 정보를 리턴해야 한다는 사실을 기억하자. SpEL 기반 접근권한 설정은 Boolean 결과를 리턴하는 표현식으로만 구성되어야 한다.
또한 접근 제어 설정이 유효하지 않은 표현식을 포함하지 않는 이상 보류를 의미하는 결과를 리턴할 수도 없다. 접근제어 설정에 사용된 SpEL 표현식이 유효하지 않을 경우에만 voter 는 접근결정을 보류한다.
Spring Security 3 - 맛보기와 기본 설정의 이해 에서 스프링 시큐리티가 디폴트로 제공하는 로그인 페이지를 본 적이 있을 것이다. 이 포스트에서는 이 디폴트 로그인 페이지를 우리가 개발한 로그인 페이지로 변경하는 방법을 알아보자.
우리가 개발한 로그인 페이지를 적용해 보기 전에 먼저 Spring Security 3 - 맛보기와 기본 설정의 이해 의 접근권한 설정방식을 SpEL 표현식을 사용해서 다음과 같이 수정해 보자.
1 2 3 4 | <security:http auto-config="true" use-expressions="true">
<security:intercept-url pattern="/favicon.ico" access="permitAll" />
<security:intercept-url pattern="/*" access="hasRole('ROLE_USER')" />
</security:http>
|
우리가 개발할 로그인 페이지를 적용하는 절차를 요약하면 다음과 같다.
1. 로그인 페이지를 개발한다.
2. 로그인 페이지를 http 엘리먼트 내부의 <form-login> 엘리먼트에 설정해 준다.
3. 로그인 페이지 자체에 대한 적절한 접근 권한을 설정해 준다.
우리가 만든 로그인 페이지가 잘 적용되는지만 확인해 보기 위해서 아무 내용도 없는 login.jsp 를 만들고 기본설정을 아래와 같이 변경한 후에 로컬 서버에 배포해 보자. login.jsp 는 http://localhost:8080/login.jsp 로 접근할 수 있다고 가정한다.
1 2 3 4 5 | <security:http auto-config="true" use-expressions="true">
<security:intercept-url pattern="/favicon.ico" access="permitAll" />
<security:intercept-url pattern="/*" access="hasRole('ROLE_USER')" />
<security:form-login login-page="/login.jsp"/>
</security:http>
|
브라우저에 http://localhost:8080 을 입력하면 우리가 개발한 로그인 페이지대신 다음과 같은 오류 화면이 나타날 것이다.

이와 같은 오류 화면이 보이는 이유는 방금 우리가 개발한 login.jsp 를 포함하는 모든 URL 접근시에 ROLE_USER 라는 접근권한을 필요하다고 다음과 같이 설정했기 때문이다.
<security:intercept-url pattern="/*" access="hasRole('ROLE_USER')" />
따라서 /login.jsp URL 에 대해서는 모든 익명 사용자를 포함한 모든 사용자가 접근할 수 있도록 접근권한을 다음과 같이 설정해 줘야 한다.
1 2 3 4 5 6 | <security:http auto-config="true">
<security:intercept-url pattern="/favicon.ico" access="permitAll" />
<security:intercept-url pattern="/login.jsp" access="permitAll" />
<security:intercept-url pattern="/**" access="ROLE_USER" />
<security:form-login login-page="/login.jsp"/>
</security:http>
|
다시 배포한 후, 브라우저에 http://localhost:8080 을 입력해보자. login.jsp 로 리다이렉트되어 빈 화면이 보일 것이다. 이것으로 스프링 시큐리티가 제공하는 디폴트 로그인 페이지가 우리가 개발한 login.jsp 로 잘 변경된 것을 확인할 수 있다.
이제 login.jsp 가 사용자 아이디와 비밀번호를 입력받을 수 있도록 수정해줘야 하는데 몇 가지 기억해야할 사항이 있다. 사용자 아이디와 비밀번호 폼필드명과 폼이 서브밋되는 URL 은 UsernamePasswordAuthenticationFilter 에 기본적으로 설정된 것을 사용해야 한다. 물론 각 폼필드명과 서브밋되는 URL 을 변경할 수도 있지만 이 포스트에서는 변경하는 방법을 설명하지 않을 것이기 때문이다. UsernamePasswordAuthenticationFilter 에 디폴트로 설정된 필드명은 j_username, j_password 이고 서브밋 URL 은 j_spring_security_check 이다. 또 폼 서브밋시에는 POST 방식을 사용해야 한다. 그렇지 않으면 UsernamePasswordAuthenticationFilter 가 로그인 요청을 거부할 것이다.
지금까지 설명한 내용을 바탕으로 login.jsp 를 작성하면 다음과 같다.
1 2 3 4 5 6 7 8 9 | <head>
<title></title>
</head>
<form action="j_spring_security_check" method="POST">
ID : <input type="text" name="j_username" size="20" maxlength="50" /><br />
Password : <input type="password" name="j_password" size="20" maxlength="50" /><br />
<input type="submit" value="Login" />
</form>
|
지금까지 개발한 내용을 서버에 배포한 후 브라우저에 http://localhost:8080 를 입력하면 login.jsp 로 리다이렉트할 것이고 login.jsp 가 제공하는 폼에 guest/guest 를 입력하면 정상적으로 로그인되는 것을 확인할 수 있을 것이다.

